# Instadapp Pro Help Docs

Welcome to Instadapp Pro Help Docs

Welcome to the Instadapp Pro Help Center. Instadapp Pro is the premier middleware platform for DeFi. Instadapp Pro enables you to interact with numerous DeFi protocols such as [**MakerDAO**](/protocols/makerdao)**,** [**Compound**](/protocols/compound)**,** [**AAVE**](/protocols/aave) and [**Uniswap**](/protocols/uniswap). In this site you can find user guides as well as information around the underlying protocols and components of Instadapp Pro.

<figure><img src="/files/lbLpKgxi6LSLmW6822SP" alt=""><figcaption></figcaption></figure>

*Instadapp is live on Mainnet, Polygon, Avalanche, Arbitrum, Optimism and Fantom Networks.*&#x20;

#### **Instadapp Pro:** [https://pro.instadapp.io/](https://defi.instadapp.io/)

Instadapp Pro works with self-custodial smart wallets. You can access Instadapp Pro with your **Avocado Wallet** or **DeFI Smart Account (DSA)** smart wallet.

#### Looking for Technical Documentation?

Instadapp is powered by its robust Instadapp SDK, empowering users to create DeFi transactions with ease. Learn more about the technical components and capabilities of Instadapp at: <https://docs.instadapp.io/>


# Managing Assets on Instadapp

Instadapp Pro works with Smart Contract wallets specifically the **DeFi Smart Accounts (DSA)** and the **Avocado Wallet.**

<figure><img src="/files/n1xlhdIhx2W6zvQy95aS" alt=""><figcaption><p>Instadapp PRO works with both types of Smart Accounts</p></figcaption></figure>

{% hint style="info" %}
We recommend users use Avocado Wallet as it is a superior wallet to the DSA. The Avocado Wallet has greater security features and can connect any DApp and other Web3 applications.
{% endhint %}

### Avocado Wallet Management

You can use the Avocado UI to access a full featured interface for the Avocado wallet. Avocado Wallet is the most advanced web3 wallet available! Avocado works like any other wallet, to get started simply deposit funds into the avocado address, when connected to Instadapp Pro all your Avocado balances will reflect in the Instadapp Pro UI.&#x20;

**Avoacdo Wallet UI:** <https://avocado.instadapp.io/>

{% content-ref url="/pages/N8eBXgKd55wI6xAqgxin" %}
[Avocado Wallet](/smart-wallets/avocado-wallet)
{% endcontent-ref %}

### DeFi Smart Account Management

DeFi Smart Accounts have their home on Instadapp Pro. When connecting with your EOA you will be prompted to create a DeFi Smart Account. See the topics below for using and managing a DeFi Smart Account with Instadapp Pro:

{% content-ref url="/pages/7aAoht0PV28xsqSc5ehX" %}
[Depositing from your Connected Wallet into DSA](/smart-wallets/defi-smart-account-dsa/depositing-from-your-connected-wallet-into-dsa)
{% endcontent-ref %}

{% content-ref url="/pages/8jhpt7axT5SmhNyDEsvQ" %}
[Migrating DeFi assets into your DSA](/smart-wallets/defi-smart-account-dsa/migrating-defi-assets-into-your-dsa)
{% endcontent-ref %}

{% content-ref url="/pages/Jcy4Wg77r5xiQYyGQFD7" %}
[Withdrawing to your Connected Wallet](/smart-wallets/defi-smart-account-dsa/withdrawing-to-your-connected-wallet)
{% endcontent-ref %}


# Simulation Mode

Use simulation mode to test various functions on Instadapp gas free!

Instadapp has a built in simulation mode which you can use to quickly activate a test mode for your accounts. You can use simulation mode to test new protocols, plan and test different changes to your account or use it to play around and learn more about Decentralized Finance.

### How to activate Simulation Mode?

You can activate Simulation Mode at any time! You can find the toggle in Global Settings as well as on the left side panel.

<figure><img src="/files/MWyVuy0BkNyRsRiOUlFi" alt=""><figcaption><p>You can activate Simulation Mode at any time!</p></figcaption></figure>

Once activated, Simulation mode creates a forked environment of your account. Your account will receive 100 ETH tokens to help you play around and test with. You can swap to other tokens as needed.&#x20;

<figure><img src="/files/vWlL1Xhf8JARtJxzqcuY" alt=""><figcaption></figcaption></figure>

Once activated you will see the Simulation Mode label on the top navigation along with the timer for the simulation. Also your balance will have increased by 100 ETH 🚀

### Add Test Tokens added to your Simulation

Need some test funds? You can top up with test tokens by adding tokens, find this button under the simulation button

<figure><img src="/files/ul66I1fV4LPyK4rijG9P" alt=""><figcaption></figcaption></figure>

#### Some Notes on Simulation Mode

* Simulation Mode lasts 30 minutes after the simulation will end. You can reactivate it as many times as you want.
* Some tokens may have incorrect or delayed pricing on simulation mode
* Some advanced operations won't work correctly in simulation mode like Hop cross chain transactions and Uniswap rebalancing for example.
* ***Need more ETH?*** Go to the Deposit panel and you can deposit an additional 100 ETH.


# Debt Collateral Ratio

Learn more about how Instadapp displays risk parameters on DeFi protocols

***Your position may look different on Instadapp, but Instadapp doesn't modify or change the underling protocol.***

Instadapp GUI interacts with various lending protocols each lending protocol uses different math to show risk to the user. On the Instadapp Dashboard we show users risk in two ways:&#x20;

* ### Max Debt to Collateral Ratio <a href="#block-042b3a14f75b4294be02054af09f188f" id="block-042b3a14f75b4294be02054af09f188f"></a>

* ### Heath Factor [used by AAVE](https://docs.aave.com/faq/borrowing#what-is-the-health-factor)

## Max Debt to Collateral Ratio <a href="#block-042b3a14f75b4294be02054af09f188f" id="block-042b3a14f75b4294be02054af09f188f"></a>

#### Debt to Collateral Ratio

Debt to Collateral is a simple formula. To find the debt to collateral ratio you divide the value of the outstanding debt to the value of the collateral.

![$1000/$2000 = 50 %](https://codex.instadapp.io/_next/image?url=https%3A%2F%2Fsuper-static-assets.s3.amazonaws.com%2F52f07785-fab3-4b4a-8409-e5be158d058c%2Fimages%2Feac44455-d49b-413a-8569-f9e185e254bb.png\&w=3840\&q=80)

#### Max Debt Ratio: How much credit? <a href="#block-04b5b11f82764105839ef8fae38be646" id="block-04b5b11f82764105839ef8fae38be646"></a>

Most protocols use Collateral Factor (or another term) which describes how much a user can borrow against their deposit. These parameters are usually determined by the asset time. For example: If Bitcoin has a Collateral Factor of 0.5 then a user can borrow up to 50% of its value. Collateral Factor is sometimes called Loan to Value on other platforms and services.

![$1000 USDC \* 85% = $850 ](https://codex.instadapp.io/_next/image?url=https%3A%2F%2Fsuper-static-assets.s3.amazonaws.com%2F52f07785-fab3-4b4a-8409-e5be158d058c%2Fimages%2F1bd6fa78-3b20-494a-af2c-ca8f823d3e57.png\&w=3840\&q=80)

#### Maximum Debt to Collateral Ratio <a href="#block-49d9e786d1244401b8efc27b808cb57a" id="block-49d9e786d1244401b8efc27b808cb57a"></a>

The percentage at which liquidations occur is determined by the various collateral factors of the underlying assets. The average collateral factor of all the supplied assets becomes the **Maximum Debt to Collateral Ratio**.Hitting the Maximum Debt to Collateral Ratio in any protocol will trigger the liquidation process.&#x20;

**Each protocol has their own liquidations process please refer to the specific protocol to understand its unique liquidation process:**

{% content-ref url="/pages/bC8l4CQ7CjbKHIYhXO4n" %}
[Liquidations on MakerDAO](/protocols/makerdao/liquidations-on-makerdao)
{% endcontent-ref %}

{% content-ref url="/pages/uS9dVLiYEDyAdLQ9zswK" %}
[Liquidations on Compound v2](/protocols/compound/liquidations-on-compound-v2)
{% endcontent-ref %}

{% content-ref url="/pages/wInYYy58MIIjqMo8XOXK" %}
[Liquidations on Liquity](/protocols/liquity/liquidations-on-liquity)
{% endcontent-ref %}

## D/C Ratio compared to Borrowing Factor <a href="#block-d4461b97692c4e9598d9b0dfc1b200c1" id="block-d4461b97692c4e9598d9b0dfc1b200c1"></a>

![This is the same position on Compound shown on Instadapp (left) and Compound (right)](https://codex.instadapp.io/_next/image?url=https%3A%2F%2Fsuper-static-assets.s3.amazonaws.com%2F52f07785-fab3-4b4a-8409-e5be158d058c%2Fimages%2F0671d8a2-916e-4d3b-8de1-d35f944918fe.jpeg\&w=3840\&q=80)

### Borrow Limit used on Compound:  <a href="#block-58d099cdb20c4b078ba67b4cad0928cf" id="block-58d099cdb20c4b078ba67b4cad0928cf"></a>

#### How Compound Finance calculates its Risk Parameter <a href="#block-58d099cdb20c4b078ba67b4cad0928cf" id="block-58d099cdb20c4b078ba67b4cad0928cf"></a>

![](https://codex.instadapp.io/_next/image?url=https%3A%2F%2Fsuper-static-assets.s3.amazonaws.com%2F52f07785-fab3-4b4a-8409-e5be158d058c%2Fimages%2F4fce5479-dd31-4827-a5bd-147c24fb6335.png\&w=3840\&q=80)

### Debt to Collateral Ratio used on Instadapp:  <a href="#block-d65231b69d7643b1bde6dd3b8d737a0a" id="block-d65231b69d7643b1bde6dd3b8d737a0a"></a>

#### How Instadapp calculates its Risk Parameter <a href="#block-d65231b69d7643b1bde6dd3b8d737a0a" id="block-d65231b69d7643b1bde6dd3b8d737a0a"></a>

![](https://codex.instadapp.io/_next/image?url=https%3A%2F%2Fsuper-static-assets.s3.amazonaws.com%2F52f07785-fab3-4b4a-8409-e5be158d058c%2Fimages%2F2e57de4f-dfd0-4475-a484-c16294b2547f.png\&w=3840\&q=80)

In the example above only one collateral was used (wBTC) and its collateral factor is 60% Therefore, when the position hits 60% debt to collateral ratio it will reach liquidation.

### Multiple Assets changes the Maximum Debt to Collateral Ratio <a href="#block-97e49a43b45246e0945ca4ddb6bf3b92" id="block-97e49a43b45246e0945ca4ddb6bf3b92"></a>

If there were multiple assets held then, the Maximum Debt is calculated by the collateral factor of the multiple assets based on weight.

**For example:** A Compound position that is half USDC and half wBTC has a Maximum Debt Ratio of 67%.

**For example**: A Compound position is 75% USDC and 25% wBTC has a Maximum Debt Ratio of 71%

### Liquidations are not different on Instadapp <a href="#block-7dfee002339e45aea935cd1b8e3c89b6" id="block-7dfee002339e45aea935cd1b8e3c89b6"></a>

The price and position in which a user is liquidated is the same. Reaching the **Borrow Limit** on Compound, is functionally the same as hitting the **Maximum Debt to Collateral Ratio** on Instadapp. You can check this by calculating them together:

![](https://codex.instadapp.io/_next/image?url=https%3A%2F%2Fsuper-static-assets.s3.amazonaws.com%2F52f07785-fab3-4b4a-8409-e5be158d058c%2Fimages%2F652dfd88-6b7e-42c4-9b9e-36255af4e4db.png\&w=3840\&q=80)


# Custom Tokens

Add Custom tokens to the Instadapp Dashboard

The Instadapp Dashboard starts with a default set of tokens. You can add any token by entering the token contract address and then the token will appear in all menus on Instadapp.

### Where to find the Token Management Menu

![](/files/Y9x45gOwUEppVMEmNPzq)

#### You can search by Token name or enter the token contract address then click the `+ Add` button to enable the token on the interface

![](/files/HNUCku5kAmbqIE5wXTeh)

#### We utilize Token Lists so you can quickly add more lists by clicking the Token List button on the bottom and add tokenlists from Coingecko, Optimism and Tokenset&#x20;

![](/files/9qfCZNoJoxFNXe5ey0kA)

#### Also note when searching you will be shown the tokenlist provider of the token address:

![Each asset found through the search menu is labeled by its source](/files/U7VDjJ4RTyLu54v8jaJ5)

#### After adding tokens you can find them in all menus on Instadapp including the DSA Balances, Trade, and DApps like Uniswap

![Add Custom tokens to create Uniswap positions with any token you want](/files/WUx50mzxvoU36VPQkxIr)


# Authority

Learn about DeFi Smart Account Authorities

Instadapp works by creating each user a non-custodial smart contract wallet called a **DeFi Smart Accounts(DSA).** When you first access Instadapp you will be asked to create an account. The address that generated the account will become the DeFi Smart Accounts first Authority.

* You can add any number of Authorities to your account and access the same DSA with different addresses.&#x20;
* Authorities to the account will have full access to the account please only add addresses you control.
* You can transfer ownership of a DSA to another address by using Authorities.
* Smart Wallets and smart contracts can be authorities to the DSA however usage may be limited.&#x20;
* Gnosis Safe wallets have been tested to work as a DSA Authority and can add Multi-Signature functionality to your DSA. **See:** [**Using Gnosis Safe as an Authority**](/managing-assets/authority/using-gnosis-safe-as-an-authority)

{% hint style="danger" %}
Remember Authority controls access and ownership to your account. Please take extra precaution modifying authorities. ***The Instadapp team cannot recover your account if you remove access to your account.***
{% endhint %}


# How to add an Authority to your Account

#### Open the Account Authority Page <a href="#block-51d9414d03fc4101928f731776da043c" id="block-51d9414d03fc4101928f731776da043c"></a>

The Authority page can be accessed in the side panel, under `DSA Tools` find `Authority`

![](https://codex.instadapp.io/_next/image?url=https%3A%2F%2Fsuper-static-assets.s3.amazonaws.com%2F52f07785-fab3-4b4a-8409-e5be158d058c%2Fimages%2F966796b8-3e3d-4bdc-a109-67c23b6684a9.gif\&w=3840\&q=80)

#### Authority Page <a href="#block-92304d642f574d8c8672f26464e81a57" id="block-92304d642f574d8c8672f26464e81a57"></a>

The Authority page will display all DSAs associated with the currently signed on account. You can select between the various accounts.

In the middle section you will see the DSA Address, its DSA#, and its address in QR Form The current authorities are listed in the bottom section.

![](https://codex.instadapp.io/_next/image?url=https%3A%2F%2Fsuper-static-assets.s3.amazonaws.com%2F52f07785-fab3-4b4a-8409-e5be158d058c%2Fimages%2F1c664f75-4f4b-4fc9-8386-2cfb5c46529d.png\&w=3840\&q=80)

#### Select Account and Add new Authority <a href="#block-d852d601107749588feb138cf27eb1af" id="block-d852d601107749588feb138cf27eb1af"></a>

Select the DSA you would like to add an authority. You may only have one account created so it will be highlighted.

In the Authorities section, add the address of the new authority and click `ADD` to submit the transaction.

![](https://codex.instadapp.io/_next/image?url=https%3A%2F%2Fsuper-static-assets.s3.amazonaws.com%2F52f07785-fab3-4b4a-8409-e5be158d058c%2Fimages%2Fa881ca15-8e22-48fe-b2a5-5ce3624f0ded.png\&w=3840\&q=80)

#### New Authority has been added! <a href="#block-61937bab47454ff49f0eda8d7de0c3c5" id="block-61937bab47454ff49f0eda8d7de0c3c5"></a>

After the transaction confirms you will see the new owner listed under Authorities.

You can further confirm the added authority, by using the added account to log into the DSA.

![](https://codex.instadapp.io/_next/image?url=https%3A%2F%2Fsuper-static-assets.s3.amazonaws.com%2F52f07785-fab3-4b4a-8409-e5be158d058c%2Fimages%2F7f70995f-ea6c-4ec3-852c-9b6edff47c05.png\&w=3840\&q=80)

When you add an authority that address will gain full access to the DeFi Smart Account. This can be helpful if you want to grant access&#x20;


# How to remove an Authority

{% hint style="danger" %}
**DSA accounts are non-custodian so Instadapp cannot recover your account if you accidentally remove your own access to your own account.** The interface will not let you remove the last remaining Authority to an account.
{% endhint %}

#### Locate the Account you want to remove as Authority <a href="#block-c2de0aa2aed84818a90e0ef63efd0940" id="block-c2de0aa2aed84818a90e0ef63efd0940"></a>

On the Authority Page located under DSA Tools find the Authorities section.

![](https://codex.instadapp.io/_next/image?url=https%3A%2F%2Fsuper-static-assets.s3.amazonaws.com%2F52f07785-fab3-4b4a-8409-e5be158d058c%2Fimages%2F7f70995f-ea6c-4ec3-852c-9b6edff47c05.png\&w=3840\&q=80)

You an also click your Authority on the top to open the Account Side Panel.

![](/files/Turc8ExcaPnvDelwscVU)

#### Remove Authority <a href="#block-46ed910ac31349f3a5d0cb08590b2387" id="block-46ed910ac31349f3a5d0cb08590b2387"></a>

Once you have located the authority you would like to remove, click the Trash Can next to its address and you will be prompted to submit a transaction. Once this tx confirms the associated account will be removed.

![You can find your list of authorities on the Authority Panel](https://codex.instadapp.io/_next/image?url=https%3A%2F%2Fsuper-static-assets.s3.amazonaws.com%2F52f07785-fab3-4b4a-8409-e5be158d058c%2Fimages%2F0e1604ab-43fc-417f-9582-beea73f752c6.gif\&w=3840\&q=80)


# Using Gnosis Safe as an Authority

Learn how to sign DSA transactions using a multi-sig Gnosis Safe

Your Instadapp can be managed by different addresses, such as Multi-Sig wallets like Gnosis-Safe. The process for adding an authority or creating an account is the same.

![You can utilize a multi-sig wallet to share access to a DSA and add Multi-Sig functionality](/files/B2lw2R2KsAfyaPFOIeSO)

### How to sign transactions to your DSA using a Gnosis Safe authority

{% hint style="info" %}
There are multiple ways to access a Gnosis Safe
{% endhint %}

#### Using Gnosis Safe and Wallet Connect

Log into your wallet via the Gnosis Safe dashboard and go to Apps and then open Wallet Connect

![](/files/vWeTirG58MZqy9cuwtSj)

Open another tab and open the Instadapp dashboard, click connect and select Wallet Connect. In this example we are using a desktop so we will copy the code below and enter it on the Gnosis Wallet Connect page.

![ ](/files/uRt7cPy8hX7uCzK9Eskk)

![You should see this screen when its connected](/files/6XhPJpPPTOdaK2rCVp0p)

{% hint style="success" %}
In order to use Wallet Connect you must keep the Gnosis Dashboard tab open
{% endhint %}

#### Signing using Wallet Connect

Complete a transaction on Instadapp as you would normally, after clicking the final submit remember to go back to the Gnosis Wallet Connect tab to confirm the transaction.

![](/files/enDeaef3695nF0z4ZrlP)

This transaction requires 2 signatures to be executed, you will see the interface show you the transaction pending but it will not confirm.&#x20;

If the transaction is signed but not executed in a set amount of time the interface may show an error. You can ignore this and proceed to sign the transaction at any time.

#### Other Gnosis Signer executes the tx from Gnosis Safe dashboard

![The DSA transaction is expressed here as a Walletconnect transaction](/files/2MwxjyVV3KVuCq0HefJH)

![2nd Signer is able to sign and execute](/files/Z01zc6J1XucK33AaWLUI)

![We withdrew back to the Gnosis Safe from its DSA account](/files/L2PSDALchdLit35F9rNw)

Using Gnosis Safe to sign transactions may sometimes mess up with our transaction receipt. Transaction receipts are a localized transaction receipt. You can clear your transaction receipt history at any time.&#x20;

![](/files/TLpve7a00uibybnBTOKi)


# FAQs

Review Common Errors and Frequently Asked Questions

## **Wallet Misconfigurations**

### I have multiple wallets installed and Instadapp won't load either

The Instadapp interface can have issues if you have multiple wallets installed, please make sure you only have one wallet active when using Instadapp.&#x20;

**On Brave and Chrome:** You can limit which extensions are active in incognito mode, you can make it so only one wallet is active in incognito mode.&#x20;

### My wallet is being blocked on the Interface by TRM

The Instadapp interface is maintained by the Instadapp Team. We strive to be responsible participants in the financial ecosystem!. The Instadapp website works with TRM technology to filter and review any addresses that may be blocked for regulatory, compliance or other legal reasons. If you believe your address was incorrectly blocked please reach out to us: <Info@instadapp.io>&#x20;

### **Communication Error: -32000** &#x20;

The wallet was unable to generate the tx correctly this can be related to the RPC or API calls. You can try the following:

1\. Try using another RPC. See: RPC.Info\
2\. Clearing cache may also help fix this problem\
3\. Metamask only: you can clear the local metamask data.

## Import Issues

### **Error: Too many Assets**

The migration transactions can only support 5 unique collateral types, and any number of debts. If you have more than 5 collateral types to import the import will fail please attempt again.

### **Error: Too Leveraged/Too Risky**

Instadapp import will migrate the entire position including all collateral and debts. If the position to too risky the import won’t execute. You need about a 15% buffer from the liquidation point. i.e if your liquidation price is $1000 your position needs to be $150 away from that price.&#x20;

For AAVE this is around 2.5 Health depending on the mix of assets.

### Error: Disable E-Mode

Instadapp can only import your position in standard AAVe mode; Please deactivate E-Mode before importing your AAVE position into the dashboard.

## Lending Protocol Error

### **Not Enough Liquidity**&#x20;

If you received this message that means the market does not have enough liquidity to withdraw the asset. You may notice the asset has an increased lend rate because the liquidity is low this is the 'kink' mechanisms that is pushing the market to bring in deposits.&#x20;

### **Can't borrow against USDT**

USDT does not always have a 'loan to value' or collateral factor and therefor you can't borrow against it in some protocols. \
\
**USDT cannot be borrowed against** in AAVE v.2, Compound Mainnet, or MakerDAO\
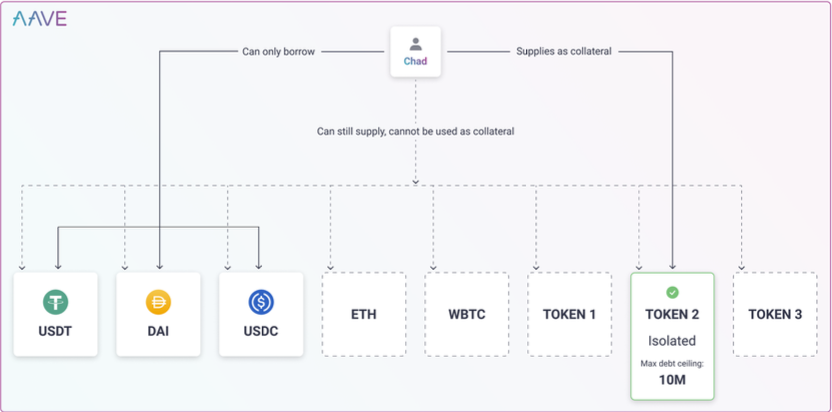
USDT can be used in *Isolation Mode* on AAVE v.3. **See:** Isolation Mode for AAVE v.3<br>


# DeFi Smart Account (DSA)

Using Instadapp with a DeFi Smart Account

Instadapp PRO was originally designed for DeFi Smart Accounts (DSAs), you can find all the functionality required to manage and use your DSA on Instadapp Pro.

{% content-ref url="/pages/7aAoht0PV28xsqSc5ehX" %}
[Depositing from your Connected Wallet into DSA](/smart-wallets/defi-smart-account-dsa/depositing-from-your-connected-wallet-into-dsa)
{% endcontent-ref %}

{% content-ref url="/pages/8jhpt7axT5SmhNyDEsvQ" %}
[Migrating DeFi assets into your DSA](/smart-wallets/defi-smart-account-dsa/migrating-defi-assets-into-your-dsa)
{% endcontent-ref %}

{% content-ref url="/pages/Jcy4Wg77r5xiQYyGQFD7" %}
[Withdrawing to your Connected Wallet](/smart-wallets/defi-smart-account-dsa/withdrawing-to-your-connected-wallet)
{% endcontent-ref %}


# Not able to see your wallet balance?

You just connected your wallet, like Metamask and now you cannot see your balances, we know it’s weird. However, it's for a greater cause. Let us explain.

Your wallet balance is different from the balances you see here. These balances are known as your DSA (DeFi Smart Account) balance, which is a smart contract account 100% owner and managed by your wallet. The DeFi Smart Account has its own address so in order to get your balances into the DSA, you have to make use of the deposit button here to deposit your assets into the DSA.

![](/files/h0A0fGoPoTcUixhqx0Dv)

You might wonder why this is needed, why you can’t directly use the balances on your Metamask. The DSA provides endless possibilities to manage your DeFi assets. This DSA allows you to:

1. Manage multiple positions on different protocols on a single dashboard.
2. Allows you to set multiple owners or managers with different abilities.
3. Allows you to create multiple accounts on different chains.
4. Allows you to use single-click strategies to help maximize your yields like Leverage, Debt/Collateral Swap, etc.

Upon clicking “Deposit” you will be able to see your current balances in your wallet. Find the ones you want to add to your DSA by clicking on “Deposit”.

![](/files/HgZbRXJj5wz5IxiuaOQX)

Now you can set the amount you would like to deposit into your DSA, finalized, and send the transaction by clicking the Deposit on the bottom of this panel. Your deposit will appear in your Balances after it confirms.

![](/files/UOeFDb3HtGqWDoqc8adW)

Once these balances are added you can make use of the features of the DSA mentioned above!

{% hint style="info" %}
You can send tokens from the same network to your DSA address. Only send funds to your DSA on the same network.
{% endhint %}

If you are migrating your DeFi assets into your DSA from another protocol, [read this](/smart-wallets/defi-smart-account-dsa/migrating-defi-assets-into-your-dsa).

If you want to withdraw your assets from your DSA to your wallet, [read this](/smart-wallets/defi-smart-account-dsa/withdrawing-to-your-connected-wallet).


# Depositing from your Connected Wallet into DSA

How to deposit from your connected wallet into the DSA

To deposit funds from your connected wallet, go to side panel and find **Deposit**. This will open and list your wallet's assets.

![](https://downloads.intercomcdn.com/i/o/461942443/175c96faf4a656f9269ef587/Screen+Shot+2022-02-08+at+5.19.40+PM.png)

#### Find the desired asset and click the deposit

![](https://downloads.intercomcdn.com/i/o/461942459/c78a69a88b9f148a1494fb40/Screen+Shot+2022-02-08+at+5.19.53+PM.png)

Now you can set the amount you would like to deposit into your DSA, finalized and send the transaction by clicking the **Deposit** on the bottom on this panel. Your deposit will appear in your balance after it confirms.

<div align="center"><img src="https://downloads.intercomcdn.com/i/o/461233842/402791b550b4f90bd9dbf0b5/deposit+button.gif" alt="

"></div>


# Migrating DeFi assets into your DSA

Migrate Positions from your Owner Wallet

You can migrate DeFi [Positions](broken://pages/eEmDOT9jetpQn1o1dsv5#position) from the owner wallet into your DSA. This process will migrate your entire balance out of the protocol and move the position including all assets and debt into your DSA.

{% hint style="info" %}
You can similarly migrate positions onto Avocado. Please see the Avocado UI for migration details.
{% endhint %}

You can find the **Import Positions** tool on the left side panel under **DSA Tools**

![](https://downloads.intercomcdn.com/i/o/461243113/932af03dd07c24a400ea3074/Screen+Shot+2022-02-07+at+5.06.41+PM.png)

This page will list any positions which can be imported. In order to migrate your debt position your DSA will need permissions for the collateral tokens. Click **Give Allowances** and one transaction will be sent per asset.

{% hint style="info" %}
Token Permissions are only needed for Assets not for Debts. You can revoke these permissions after importing your position.
{% endhint %}

![](https://downloads.intercomcdn.com/i/o/461245239/0ae1be98d6ca3fed7c90a4ac/allowance.gif)

After the allowances are completed, you can click **Import** to import the position. The position will appear in your DSA after it is confirmed.

#### Supported Position Imports <a href="#h_b9adc20fc7" id="h_b9adc20fc7"></a>

| **Network** | **Supported Protocols**                         |
| ----------- | ----------------------------------------------- |
| Mainnet     | MakerDAO Vaults, AAVE, Compound, Liquity Troves |
| Polygon     | AAVE                                            |
| Avalanche   | AAVE                                            |
| Arbitrum    | AAVE                                            |
| Optimism    | AAVE                                            |

*Note your position will need to be 20% away from its max debt to collateral ratio to be imported.*


# Withdrawing to your Connected Wallet

### Standard Withdrawal <a href="#h_b374804eb9" id="h_b374804eb9"></a>

To withdraw funds out of the DSA go to the Withdraw button on the side panel. This will open all assets deposited in the DSA.

![](https://downloads.intercomcdn.com/i/o/461944020/3464c728da5c0d300010844d/Screen+Shot+2022-02-08+at+5.26.38+PM.png)

Find the desired asset and click **withdraw**.

![](https://downloads.intercomcdn.com/i/o/461945765/9f7dbc721d9e5964f92adcc4/Screen+Shot+2022-02-08+at+5.26.49+PM.png)

Now you can set the amount you would like to deposit into your DSA, finalize and send the transaction by clicking the Deposit on the bottom on this panel.<br>

![](https://downloads.intercomcdn.com/i/o/461944200/cada15386cfb0b8ea221330c/withdrawal.gif)

Your deposit will appear after in your connected wallet after the transaction has confirmed.


# Advanced Withdrawals

Withdraw from assets to other DSAs or external addresses

You can use the Withdraw screen to send assets to other DSA accounts you control or to any address you would like.

#### To open Advanced Withdrawals check the Advanced Options ticker:

![](https://downloads.intercomcdn.com/i/o/461953408/668ae9e39ebe359f39747bdc/advanced.gif)

### Advanced Withdraw: To your other DSA Accounts <a href="#h_03e10d8dbb" id="h_03e10d8dbb"></a>

This will list your other DSA accounts associated with the connected account, you can select an account here and click withdraw.

### Advanced Withdraw: To Any Address on the Same Network <a href="#h_46dd5345e4" id="h_46dd5345e4"></a>

{% hint style="danger" %}
***Some exchanges do not accept Smart Contract withdrawals please double check if you are sending to a 3rd party service.***
{% endhint %}


# Advanced Deposits

Learn how to deposit directly into your DSA

### Send Funds Directly to the DSA Address on the Correct Network <a href="#h_2d2379d70a" id="h_2d2379d70a"></a>

You can find your DSA address on the Deposit panel as well as under Authority Settings.

![](https://downloads.intercomcdn.com/i/o/461956714/7e539966633134afffcf8b0f/deposit.gif)

### Your DSA address is Network Specific !

{% hint style="danger" %}
***If you send funds to the wrong network those funds will be lost!!!***&#x20;
{% endhint %}

You can deposit directly into your DSA however, *DSA addresses are smart contracts and therefore are network specifi&#x63;**.*** For example your Polygon DSA address does not correspond to an Ethereum Mainnet DSA.

{% hint style="danger" %}
***Let me repeat that again, if you send funds to a DSA on the wrong network those funds will be lost!!!***
{% endhint %}


# Avocado Wallet

Introduction to Avocado Wallet

Avocado Wallet is a highly advanced smart wallet designed to enhance your web3 experience. With Avocado, you get a full-featured multi-network wallet that can be used on Instadapp PRO and seamlessly connected to any DApp via WalletConnect.&#x20;

Avocado offers powerful Account Abstraction features, including network, gas, and transaction abstraction, making your interactions smooth and hassle-free.&#x20;

### To find your Avocado Wallet address simply log into Avocado Wallet:

You will find your EOA has an Avocado Wallet associated with it. You can find this on the right side corner. You can send funds into your Avocado Wallet address directly or deposit using the Onboarding UI.

<figure><img src="/files/kZ4kCPlZEBLvZJ7VYJPt" alt=""><figcaption></figcaption></figure>

***Want to learn more about Avocado? See the following links for Avocado:***

* [Avocado Quick Start Guide](https://help.avocado.instadapp.io/en/articles/7038838-a-checklist-to-get-started-with-avocado)
* [Avocado Help Center](https://help.avocado.instadapp.io/en/)
* [Avocado How to Connect to External DApps / Instadapp PRO](https://help.avocado.instadapp.io/en/articles/6848656-connect-dapps-on-avocado-using-walletconnect)

### **Use WalletConnect to connect to Instadapp Pro:**

Open a seperate tab or window with Instadapp Pro. When connecting click on WalletConnect.

<figure><img src="/files/rFBnXNOojudVVTIkJoZx" alt=""><figcaption></figcaption></figure>

On the WalletConnect pop up click 'Copy to clipboard' to copy the WalletConnect code and paste it into Avocado Wallet to connect.

<figure><img src="/files/AhfS5Bx4kmjjuc2ZiLax" alt=""><figcaption></figcaption></figure>

<figure><img src="/files/rJ61yXRr2ME1ApFKnOwQ" alt=""><figcaption></figcaption></figure>

You can confirm your using Avocado by seeing the Account name shown here as Avocado

<figure><img src="/files/YmKARlv99Jl2dL0RiKKM" alt=""><figcaption><p>Your Avocado Balances of the connected network will be shown on the right side.</p></figcaption></figure>

{% hint style="info" %}
In a future update, Avocado Wallet will be more integrated into Instadapp Pro, enabling top ups and direct connections!
{% endhint %}


# Cross Chain Bridge

Withdraw assets from your DSA to another network

Your DSA is powered with Cross chain superpowers! You can withdraw from your DSA to another network. The current cross chain bridge provider is **Hop.Exchange.**

#### To use Cross Chain Transfer open the Withdraw menu and click **Cross Chain Transfer**

![](/files/htGvxHy8eFourbPOLMsL)

#### Enter the amount for withdrawal and select a destination network in the top section

![Each Network has its own minimums for transfer](/files/GLv2xsl2Oxp9eP8Q2ZPb)

#### Select your withdrawal destination you can enter an address or send to an associated DSA

{% hint style="warning" %}
When creating cross chain transfers please confirm you are receiving to a valid address on the destination chain. If you send funds to an invalid address those funds may be lost.
{% endhint %}

![](/files/svC6fITcyqo3EiHAV7eW)

#### **Withdrawal Address**

**Your DSA Accounts**

This option will list all the DSA accounts associated with the connected address on the correct destination network.

**Another Address**

This will allow you to enter an address to withdraw to. You can also click `use Connected Address` to have the interface input your currently connected address as the receipt.&#x20;


# Protocol Refinancing

You can quickly refinance your loans between the leading lending protocols

Need to switch up your loan? Want to increase the LTV or maybe you found a more favorable interest rate? Whatever the reason, you can quickly migrate your positions and debts using the Instadapp's Multi-Protocol Refinancing.

<figure><img src="/files/aE5KBPP8ffeRJPWkrcoP" alt=""><figcaption></figcaption></figure>

## **What is Protocol Refinancing?**

One of the handiest features Instadapp offers is the ability to ‘refinance’ or migrate positions between protocols with just one click! We are excited to relaunch the new & improved refinancing feature with even more options! You can now do a lot more including doing stable debt transfers & migrating between additional protocols like Morpho & Euler.

DeFi is a rapidly changing space with dynamic yield & interest rates, sometimes varying vastly between protocols. In order to maximize yield from your funds or have a higher liquidation margin, it's crucial to grab the best rates and ratios possible and Refinancing allows you to do just that!

### Reasons to Refinance

There may be different reasons to migrate between protocols such as refinancing between protocols to receive better rates, or better liquidation conditions. Users can also utilize the Refinancing tool to better manage assets between protocols by refinancing a portion of the position or migrating liabilities.&#x20;

### Where to find Refinance tool?

{% embed url="<https://youtu.be/Uta8I2lH00s>" %}
You can find Refinancing under Utilities on the left side panel
{% endembed %}

## **Multi-Protocol Refinancing Panel**

On the refinancing panel you will find two panels, in the first select your initial position and in the second select the destination protocol.

![](/files/344yOaD7LCoR2yXdJ9LF)

In the center console enter the values you would like to migrate or use the Set to max button to fully migrate the position. You can migrate a portion or all of your debt. Note when migrating partially the resulting positions both need to be safe or around 10%-15% away from Max Debt to Collateral.&#x20;

<figure><img src="/files/FLHNSSsbVhrhC8UCbPwL" alt=""><figcaption><p>The Refinance tool is flexible, you can partially migrate debt and assets or you can do a full refinance!</p></figcaption></figure>

Review your position and projected position, when satisfied submit the refinance by clicking `Refinance`

<figure><img src="/files/Vk61WnuZT5UHfTehXnjB" alt=""><figcaption><p>Once the transaction is complete your position will be migrated!</p></figcaption></figure>

{% hint style="info" %}
Feeling unsure about refinancing your position? Want to view the position in the new protocol beforehand? Test it out first using [Simulation mode](/managing-assets/simulation-mode)
{% endhint %}

## More Refinancing Tools on Instadapp

There are additional strategies for refinancing internally within a protocol and other refinancing strategies. You can find these in the protocol's strategy page.

**1-Click Migrate to Morpho:** For Compound and AAVE users who want to migrate into the equivalent market on Morpho, you will find the 'Migrate to Morpho' under the strategies. This will automatically populate the refinance tool for a 1-click refinance experience! See our Morpho refinancing guide here:

{% content-ref url="/pages/6yThUpt6yEKXt5ep6men" %}
[Refinancing to Morpho](/walkthroughs/refinancing-to-morpho)
{% endcontent-ref %}

**Euler Debt and Collateral Transfer:** For migrating and refinancing debt between Euler sub-accounts there is the strategy 'Debt and Collateral Transfer' which allows you to move assets and debts between your Euler Sub-Accounts.

{% content-ref url="/pages/zzF8aCSnUhoytKBsDQHz" %}
[Debt and Collateral Transfer](/protocols/euler/debt-and-collateral-transfer)
{% endcontent-ref %}

**MakerDAO Vault Swap:** For migrating and refinancing debt between Maker Vaults you can find a specific strategy just for this function in the MakerDAO strategies called 'Vault Swap.' When refinancing between Vaults still must maintain vault debt minimums.


# Sweep Swap

Swap multiple tokens in one transaction

## Where to find Sweep Swap

#### In the trade menu you can find click Sweep Swap

![](/files/N8eIwMhZkjYmxtJOISjb)

### Using Sweep Menu

#### First choose which asset you want to sweep swap tokens into by selecting the dropdown

![](/files/IuuhB5bHC6vKh5zN1LLJ)

#### Click the `+Choose` button to open the menu select which tokens you want to swap and click confirm

![ The token selection screen will show your DSA token balances](/files/MuKNT6u3XIdEXtJrOpcH)

#### Enter the quantity for each token selected

![](/files/o212xSa2FOuCBpzOWIxF)

*Also note you add more token using the + Add button as well as remove selection or use max button to completely sweep smaller balances*

![](/files/zveWdyFik8G0azOX3eov)

Once you are done click you can see an estimate for the swap. Click `Swap` to submit and complete your Sweep Swap!

![](/files/G46vxozSyErdwGqprpq3)

### I want to swap to another token but it is not on the token list

You can add any token to be used on Instadapp through the [Custom Token Menu](/managing-assets/custom-tokens)


# Protection Automation

Learn how to use Automation to manage positions

Instadapp has automation features which you can use to supercharge your DeFi experience. Protection Automation is an automated unwind transactions that you can set to have automation pay down debt when a positions becomes risky.

### Where to find Protection Automation

You can find Protection Automation in the Strategy tab. **Protection Automation** is only available for AAVE v.3 on the Polygon and Avalanche Networks.

![](/files/eHTbYBBpOGzumuG5y3RB)

You can find a complete view of your automation history in the Automation page found under Utilities. For more information on the Automation page see: Automation History

### How to setup and use Protection Automation

Protection Automation is currently available for AAVE v3 and uses Health Ratio to set the parameter. Protection Automation works by using two variables a **Triggering Health Factor** and a **Target Health Factor.**

![](/files/CAabbA4ks5NkNj32bxe0)

Automation requires a minimum value of collateral assets. This minimum is only required when activating Protection Automation.

* **Mainnet:** a minimum of **$15,000 USD** worth of collateral to activate Automation
* **Polygon:** a minimum of **$1000 USD** worth of collateral to activate Automation
* **Avalanche:** a minimum of **$5000 USD** worth of collateral to activate Automation

#### Automation Gas Fees (Mainnet only)

For automations on Mainnet you will also pay the gas required to execute the automation. This fee will be paid through the collateral in the position.&#x20;

#### **Set the Triggering Health Factor**

This value represents when the automation should occur. You can see your current risk factor and enter a value that is lower than your current health factor. Whenever the position's health factor falls below the triggering health factor protection automation will submit a transaction to SAVE the position.&#x20;

![](/files/cQfMzSxyJCa4AexA8rkw)

#### Set the Target Health Factor

The target Health Factor determines how much the automation will pay back. You can set the desired Health Factor and automations will pay back your position to this level. Once you are done click Automate to begin Protection Automation.

![The highest number for target Health Factor is 1000 i.e no debt in the position](/files/IIGlBK3e9I9bCzTj4qk0)

{% hint style="success" %}
***Want to close the position using automation?*** Set the Target Health Factor to 1000 if you would like Protection Automation to pay back all the debt when triggered.
{% endhint %}

![Once the Automation transaction confirms you'll find Protection Automation ACTIVE](/files/TXPEvXJShYfswe5cOBjZ)

### Reviewing Automations and Transactions

You can find all transactions and operations related to Automation in Utilities under Automation

![This image is in production final design may change](/files/6mjoXmmItbOp5h9G0z1E)

### Automation Example

Let's review an example of how the Triggering H.F and Target H.F work together in setting up automation. Let's use a sample position which has a current Heath Factor of 2.5. We will set the Trigger Health Ratio to 2.0 and Target Health Factor to 3.0.

**We can visually represent our position and values on a line graph like so:**

![Our initial position in the example](/files/l7kG29QL4MA87jqrVw8f)

#### When Health Ratio hits or falls below ***Triggering Health Factor*** this triggers automation

![](/files/tuVS7MDGvEXWZ3ueGDUh)

#### Automation pays back debt returning position to *Target Health Ratio*

![Automation pays enough debt to bring the position to the Target Health Factor](/files/2m2IHZw7VyzHubLxPsgB)

### More information on Automation

***Protection Automation is limited to network conditions, please note that difficult market conditions and other unforeseen factors can cause losses. Please use at your own risk!***

You should continue to monitor your positions even if you set automation. If there are any issues or bugs please report them to the team.

#### Canceling Protection Automation

Protection Automation will remain active until it is turned off. You can turn automation off in the Automation panel using the Cancel button. During a market downturn the automation may run multiple times each time returning the position to the target health ratio.

#### Payback Asset

***At this time you cannot specify which asset is used to payback by automation.*** Once protection automation is set it will use any available collateral in the position during automation to payback debt.&#x20;

#### **Automation Autority**

Automation Protection requires authority to your DSA to function. This authority is added when you active automation and removed when you cancel it. You can at any time remove this authority from the Authority panel doing this will also cancel automation.&#x20;

#### Fee for Automation

There is a 0.3% - 0.4% fee per automation event. *For Mainnet only: You also pay the gas fee for the automation.*

### Learn More for Protection Automation

Instadapp Product blog Automation Protection&#x20;

{% embed url="<https://product.instadapp.io/automated-protection/>" %}


# Private Transactions

Learn how to activate and send Private Transactions

{% hint style="info" %}
*Instadapp is integrated with* [*Alchemy's Flashbots*](https://www.alchemy.com/overviews/ethereum-private-transactions) *API enabling you to submit your transaction directly to the Ethereum miners.*&#x20;
{% endhint %}

Private Transactions improves the success rate of your transaction by skipping the public mempool this prevents frontrunners from congesting or creating slippage in front of your transaction. Private Transactions can also protect from other forms of MEV attacks and maintains users privacy even when transactions fail.&#x20;

### How to activate Private Transactions

Open the Global Settings next to the Network selector, you will find a toggle for Private Transaction here. Once activated all transactions from your DSA will be send privately.

<figure><img src="/files/5kqTyaBUHYbz695AQVfJ" alt=""><figcaption><p>You can confirm that Private Transactions are activated by seeing this icon on the top nav.</p></figcaption></figure>

You will also see the private transaction icon in your transaction preview window before sending your transaction.

<figure><img src="/files/bMwJZUIIs2vhTVdv6bg0" alt=""><figcaption></figcaption></figure>

When using Private Transactions you sign a signature from your wallet instead of sending a transaction. This enables the relayer to complete your private transaction. If your transaction fails for any reason the information of your transaction is never shared publicly.&#x20;

<figure><img src="/files/HY1xleziQhfKF3cuSUXK" alt=""><figcaption><p>Private Txs will use signatures instead of transactions</p></figcaption></figure>

Thats it! Your transaction is now sent directly to miners and executes without even entering the public mempool. You can find your transaction pending in the transaction receipt panel and on-chain after it is confirmed.

### Signing Executable Transactions

Unlike most web3 signing which does not generate a transaction. Your signature here does sign a transaction that is sent to be executed through a relayer. When using Private Transactions you will see a warning like this in the transaction review window:

<figure><img src="/files/RbhdtFTliLhr0A89Yye9" alt=""><figcaption><p>The transaction preview will also warn you when in use </p></figcaption></figure>

{% hint style="info" %}
Metamask 10.25 and up require you to activate this signing method within the wallet before you can use it. Need help locating this setting? **See:** [**How to enable ETH\_Sign on Metamask**](/features/private-transactions/how-to-enable-eth_sign-on-metamask)
{% endhint %}

***Executable Signatures are dangerous and carry risk. Executable signatures can be used to perform any action on your account. Please exercise extreme caution!*** Due to the increased risk some wallets do not support these kinds of transactions.

### Learn More about Private Transactions

Private Transactions are an evolution of MEV Boost and other technical attempts to better prevent and protect users from front running and other abuses. You can learn more about the mechanisms behind Private Transactions here:

{% embed url="<https://docs.flashbots.net/flashbots-mev-boost/introduction>" %}


# How to enable ETH\_Sign on Metamask

How to enable ETH\_Sign transaction type on Metamask 10.25 or higher

Private Transactions require the highest signature type `eth_sign` starting with Metamask 10.25 this type of signature is disabled on the wallet. You must re-enable it in the wallet settings to use Private Transactions through Instadapp.

### 🎥 Visual Walkthrough

{% embed url="<https://youtu.be/NzXhZKEWF54?t=1>" %}

### How to activate ETH\_sign setting on Metamask

Click on the Metamask extension this will open the Metamask window. Click the top right colored circle to open the context menu. Scroll down and click on **Settings** and then click on **Advanced.** .

<figure><img src="/files/790YjsBymaXrVxkKm5N0" alt=""><figcaption></figcaption></figure>

On the Advanced screen scroll all the way to the bottom to find the setting `Toggle eth_sign requests` and toggle on. Now your wallet can execute Private Transactions through Instadapp!&#x20;

<figure><img src="/files/pfo2sZGgprIyanlJSsIp" alt=""><figcaption></figcaption></figure>

&#x20;We recommend you turn off eth\_sign when you are not actively using using [Private Transaction Mode](/features/private-transactions) or if you no longer need this feature.


# Quick Menu

Learn how to use the Quick Menu for easily navigating the DApp

### Locating the Quick Menu

The Quick Menu is represented as a DeFi Smart Account wallet icon located on the top bar

![](/files/ZOCVQ3dQmWufl9IbwOLf)

#### This menu will give you access to some of the most used operations on Instadapp so you can quickly navigate between menus

![Quickly jump to important screens and get more done 🪄](/files/vqMbf5jXaFubr76YnEzj)

### Quick Menu Summary

* Balance Summary
  * DSA Balance represents the total Net Worth of assets that are in your DSA Address&#x20;
  * DSA DeFi represents the net value of your DeFi positions in all protocols such as AAVE. The net value is the total value of the collateral minus the liabilities *(debt)*&#x20;
* Deposit/Withdraw&#x20;
* Trade/Sweep Swap&#x20;
* View Tx Receipt Panel
* Opens Cross Chain Bridge
* Manage Custom Tokens&#x20;
* Modify Authorities&#x20;
* Nickname DSA Account *(This information is stored locally)*
* Address Clipboard
* Disconnect Button


# Global Settings

Modify the transaction settings for your DeFi Smart Account

You will be doing lots of different kinds of transactions on Instadapp. Global settings is where you can set the slippage and gas settings for your transactions on Instadapp as well as activate private transactions.&#x20;

### Locating Global Settings

You can find the Global Settings on the top navigation section near the network selector

<figure><img src="/files/F0jK3HOKuqmT9tbX2Z3x" alt=""><figcaption><p>Your global settings effect all transactions on the platform</p></figcaption></figure>

### Gas Prices

In Global Settings you will see the current network rates for Gas. You can change the gas setting here which will change the gas fee when the transaction is sent to the wallet. Your wallet can still override this gas price.

### Slippage

Slippage represents the price tolerance your transaction will accept; this includes slippage when using all strategies and trades. This setting can also be changed on the transaction panel as well.

### Private Transactions

Private Transactions allows you to send your transaction directly to miners for safer transaction execution. **To learn more see:** [**Private Transactions**](/features/private-transactions)

### Simulation Mode

You can turn Simulation Mode on and off in this menu. Simulation mode will create a temporary fork of your account and allow you to test different transactions in a test environment. **To learn more see:** [**Simulation Mode**](/managing-assets/simulation-mode)

### Dark Mode

Turn off the lights! This turns on Dark Mode for the UI


# MakerDAO

MakerDAO is both the protocol and DAO behing the largest decentralized stablecoin **DAI** and enables users to generate loans against their crypto assets.

![](/files/C2YRuJltwLqU7o6p9yJl)

### What is MakerDAO?

MakerDAO is the protocol behind the stablecoin DAI, one of the first decentralized autonomous organizations, or DAOs, built on the Ethereum blockchain. The Maker Protocol is made up of a decentralized stablecoin, collateralized loans, and community governance. This MakerDAO project has two parts; a DAO which governs DAI, a crypto-collateralized stablecoin. The goal is to create a complete, decentralized finance ecosystem on the Ethereum blockchain network that allows for loans and savings.&#x20;


# Maker Protocol Explained

This project is also burdened by the responsibility of creating and developing the Maker Protocol, to maintain the system and manage DAI, stakeholders use a governance token called MKR. MKR holders are responsible for governing the Maker Protocol, which includes adjusting Dai stablecoin policy, selecting new collateral types, and improving governance itself. MakerDAO takes the smart contract concept to the next level by allowing the entire protocol to run autonomously, making it truly trustless (meaning that it operates a decentralized form of control and contribution). MakerDAO promotes transparency by tracking the Maker network and its processes on the blockchain. The primary goal of MakerDAO is to build a decentralized operating and governance infrastructure that will allow the creation of a stable currency with global reach.&#x20;

### The Stablecoin DAI&#x20;

DAI is built on the Ethereum network and underpinned by a system of smart contracts and decentralized price feeds, it is maintained by the Maker Protocol that is pegged to the US dollar, also known as a stable coin. Stablecoins are important in the cryptocurrency world due to the market's significant and unpredictable volatility.

For example, $100 worth of DAI is backed by at least $170 worth of Ether. Maker Protocol has several mechanisms in place to coordinate DAI supply and demand in the open market, ensuring that its price remains stable. MakerDAO aims to develop a mechanism that facilitates access to decentralized finance (DeFi) through the use of cryptocurrencies. A mechanism that encourages people to convert their Ether (and other currencies currently in use) to DAI. As a result, they will be able to use a stable currency that is widely accepted in other protocols. As a result of its decentralized and transparent currency, MakerDAO improves the efficiency and transparency of financial markets.&#x20;

### Minimum Debt&#x20;

The amount of DAI required to open and maintain the Maker Vault is known as the Minimum Debt Requirement. This is a requirement, which means that any action that would result in the vault owing less than 5000 DAI is not executable. Maker Protocol relies on prompt liquidations to prevent the accrual of bad debt. The protocol created the debt floor with the aim of preventing users from creating multiple vaults with very low debt amounts and collateral. The Debt Floor parameter determines the minimum amount of DAI that can be minted using a specific vault type for an individual vault. If a user attempts to mint DAI and the amount of DAI minted does not exceed the vault's Debt Floor, the transaction will fail and no DAI will be minted. Similarly, if a user attempts to pay back a debt that is less than the Debt Floor but greater than zero, the transaction will fail and no DAI will be paid back. Vaults The Maker Vault is a key component of the Maker Protocol that allows Dai to be generated against locked-up collateral. Vault allows users to deposit cryptocurrency as collateral and mint Dai against it. The Maker Vaults will use these cryptocurrencies to create a collateralized debt position (CDP), resulting in the corresponding DAI. You can also save it as savings by using the DAI Interest Rate Maker protocol (DIR). It is important to note that the interaction with the Maker Vault is done without an intermediary. The user interacts with it directly. There are rules of operation guiding the operation of the Maker Vaults. If you send tokens as collateral to a Maker Vault to generate DAI, the collateral will always be available under certain conditions. If the token price fluctuates beyond the “Settlement Ratio,” the system liquates the position. Liquidating the position means that the Maker Vault will sell your cryptocurrencies to keep the DAI relationship as positive and stable as possible. Vaults come with their risks as Stability Fees (SF) must be paid when producing Dai which is usually determined by MKR token voters. To reclaim collateral, users must repay the previously generated Dai as well as the accumulated SF. In essence, you want to protect the protocol and those who support it. This is accomplished through an automatic auction conducted by the Maker protocol under conditions that are clearly described in user interactions with the Maker Vaults.&#x20;

### Liquidation Penalty&#x20;

Liquidation ensures that Dai is always backed by an adequate amount of collateral by closing out Vaults that fall below the minimum required Collateralization Ratio for their given collateral type. Liquidation Penalty is the fee that vault owners must pay when their vaults are liquidated. When a Liquidation occurs, the fee is added to the Vault's total outstanding generated DAI, resulting in more collateral being sold on Auction. The penalty is required to prevent Auction Grinding Attacks, which effectively break the Auction mechanism by preventing an attacker from exploiting Maker Protocol to make profits. The proceeds from Liquidation Penalties are used to fund Surplus Auctions, which result in burned MKR. Vault Auctions The Maker Protocol's auction mechanisms allow the system to liquidate Vaults even when collateral price information is unavailable. The Maker Protocol takes the liquidated Vault collateral and sells it using an internal market-based auction mechanism at the point of liquidation. This is an Auction for Collateral. Dai received from the Collateral Auction is used to pay off the Vault's outstanding obligations, including the Liquidation Penalty fee set by MKR voters for that specific Vault collateral type. The Dai proceeds from the Collateral Auction are deposited into the Maker Buffer, which serves as a buffer against an increase in MKR overall supply caused by future uncovered Collateral Auctions and the accrual of the Dai Savings Rate If the Dai proceeds from auctions and Stability Fee payments exceed the Maker Buffer limit (determined by Maker Governance), they are sold in a Surplus Auction. Bidders compete in a Surplus Auction by bidding increasing amounts of MKR to receive a fixed amount of Dai. After the Surplus Auction, the Maker Protocol automatically destroys the MKR collected, reducing the total MKR supply. Collateral types on Instadapp Anyone can open a Vault to generate Dai by depositing accepted collateral (currently ETH, BAT, wBTC, USDC-A, USDC-B, or TUSD) and ensuring that the collateral value to total Dai generated is at least the required minimum. If that ratio is ever breached, the Vault will be liquidated. Here is a demo of ETH-USDC-GUNI and stETH/ETH all available on your Instadapp dashboard. There are a cool bunch of collateral types available to you also. ETH-USDC-GUNI Since its launch, G-UNI has gained traction, with Instadapp using it for their liquidity mining program, which has generated $15 million in TVL, as well as ongoing consideration of the G-UNI DAI/USDC pair to be used as collateral on Maker.

stETH/ETH Staked ETH or stETH. stETH is a tokenized deposit of ETH with Lido, this token represents the underlying deposit and its earned staking interest

###


# Liquidations on MakerDAO


# More Maker Info

## MakerDAO Specific Questions

### **What is the 'Minimum Debt Requirement'?**

**Minimum Debt Requirement** is the amount of DAI that must be generated to open and maintain the Maker Vault. This minimum is a requirement, meaning any action would lead the vault to have less then 5000 DAI owed is not executable.

![https://downloads.intercomcdn.com/i/o/342173565/27aa07c3f55fec002e7a05da/Maker+minimum+error.png](https://downloads.intercomcdn.com/i/o/342173565/27aa07c3f55fec002e7a05da/Maker+minimum+error.png)

### **Can I pay a portion of my Maker Loan?**

You can make partial payments to your Maker Vault as long as it maintains the minimum debt requirement. Most Vaults have a minimum debt requirement of 5000 DAI.

### **Where can I see more information about the Maker system?**

The Maker protocol has several dashboards that can help you understand the system's parameters, debt limits, rates etc.

🔢 [**Daistats.com**](http://Daistats.com) -<https://daistats.com>

🔥 [**Makerburn.com**](http://Makerburn.com) -<https://makerburn.com>


# Compound

Learn about the Compound Protocol

Compound Protocol is the longest running decentralized lending market on Mainnet Ethereum. Compound allows users to supply and borrow against their assets.

![](/files/dtMTpfWwYwmve806jaSk)

### What is Compound Protocol?

Compound protocol is an algorithmic lending market governed by the COMP token holders. Compound enables and create lending markets for cryptoassets such as ETH, WBTC and USDC. Rates are determined algorithmically and rates change with demand and supply.


# Compound Explained

Learn about the Compound Protocol

{% hint style="info" %}
The following describes Compound v2. [Click here for information on v3- >](/protocols/compound/compound-v3-explained)
{% endhint %}

### Algorithmic Lending

Compound works by algorithmic lending tables so rates are determined by supply and demand. Users can deposit assets which can be borrowed against. Depending on the asset the Compound protocol allows you to borrow a percentage against the asset; this is something called the Collateral Factor or Loan to Value. For example if WBTC has a collateral factor of 80% then users can borrow up to 80% of the value of their WBTC. If they deposit $1000 worth of WBTC they can borrow up to $800 against it.

### Tokenized Deposits - cTokens

Compound deposits are tokenized as cTokens. For example when a user deposits USDC they receive cUSDC in their wallet. The cUSDC represents their deposit and interests and when redeemed users receive their collateral plus interest. When users withdraw their deposits they are redeeming their cTokens for the underlying assets.

### Address Based Position

Compound treats each address as one position to Compound. This each address can only have one position on Compound i.e you cannot maintain two separate loans on Compound. You can use Instadapp to create additional DeFi Smart Accounts each DSA has its own unique address and can be used as a separate Compound Account.


# Liquidations on Compound v2

### Liquidations on Compound

Compound has an open liquidation system. Anyone can purchase assets from undercollateralized positions in exchange for paying off that position's debt. Liquidated assets have a close factor which limits how much debt can be repaid at one time so Compound allows for partial liquidations.&#x20;

If a position is severely undercollateraized it may be liquidated multiple times. The liquidation penalty is passed to the purchaser through a discount on the debtors asset. This method allows for debt to be cleared from the Compound protocol. To learn more about the liquidation penalities see&#x20;

### What happens when your liquidated on Compound

If your position is undercollateralized a user or bot may liquidate your position buying your collateral assets at a discount and paying off your debt. Liquidators decide which asset they purchase from the undercollaterlized position if your position has multiple assets as collateral.

### Are liquidations different between v2 and v3 Compound?

Yes! Check out this page to learn how positions are liquidated on Comp v2


# Compound v3 Explained

Learn about the new Compound v3 single base lending market

### What is Compound Protocol v3?

Compound v3 changes the cross asset market into a single borrowing market model. In this model, the 'base asset' can be borrowed against other assets. For example, the USDC base market users can supply ETH WBTC, UNI, LINK and COMP to borrow USDC.&#x20;

The only asset that earns interest in v3 markets is the base asset in this case USDC. In the future Compound can deploy other markets using different base assets like DAI, ETH, etc.

By shifting to a single borrowing asset, Compound can offer users increased security and increased collateral ratios on all assets. This also reduces the liability for each market as all debt is settled in kind.

<figure><img src="/files/1zxdbgOT9nq69Kfu3LSZ" alt=""><figcaption><p>Sample of how different markets are organized in Compound v3</p></figcaption></figure>

### Decoupled Lend and Borrow Rates

Compound v3 markets no longer tie supply and borrow rates together. This allows Compound governance more granularity to manage the interest rates of an individual market.

<figure><img src="https://lh3.googleusercontent.com/hwUtpG-7LDo5QJxWxaqLf1SLYbhBnSJBoBYgX3AQW0MTo4PchHQEQMfUls1IWxAyuDUdlSAQlwx6qg9O_HMBhInlToBzzM9ai9gYLflKZFqAovx-sRR-_hEs2EmDtSNrDFRuUlDTZs4r7cIt2tg6xaw" alt=""><figcaption></figcaption></figure>

### Liquidations on Compound v3&#x20;

Compound v3 liquidation system works a bit differently, more importantly when a position is liquidated on Compound the Compound protocol will settle the debt and close the position by converting your remainder to USDC. ***You cannot be both a lender and a borrower to a single Compound v3 market.***

When a position is liquidated Compound will settle the position in the base asset. ***This means if you are liquidated no matter how small or large, your entire position will be in USDC after liquidation.***&#x20;

Let’s say you had deposited ETH, UNI, and LINK collateral and had borrowed USDC up to the point of liquidation. Let's say just LINK fell in price and you were liquidated, after the liquidation, the protocol would settle all your collateral assets and only return the remainder as USDC supplied to Compound.

The explanation of the liquidation process above focuses on the user prospective. If you would like to learn more about how liquidations work on the contract level see below:

#### Liquidation on Compound III Docs

{% embed url="<https://docs.compound.finance/liquidation/>" %}

### Advancements in Account Management

Compound v3 has advanced features which will enable new use cases for Compound accounts; similar to Instadapp's Authority, users of Compound can grant access to parts of their accounts to other addresses or protocols. For example, you could whitelist another address to pay back debt in your Compound position or grant a protocol the ability to borrow from your account for a fee.

<figure><img src="https://lh4.googleusercontent.com/O9UbivW6CSGh0KjzrijcJUuEvLEpaF6uLbdFTDgauB2hlf0SSvuFhI_kWzgZL4mjXTp-1tv7L5CJf_1J_jDFm2QCfpyKEO0HaF7lCBRLxvPzD1ypbIP-4hNwNY0_so-dX_8Id_0L1JaIYA1rGBNUDlgBzsSl6gWnnmHE5k-UXuqel3vyIZUnaeTx5A" alt=""><figcaption><p>Increased access to accounts opens Compound v3 to new use cases!</p></figcaption></figure>

At this time these functionality has not yet been fully explored we look forward to contributing to innovation on this end!&#x20;

### Learn More about Compound v3

#### See Compound III documentation

{% embed url="<https://docs.compound.finance/>" %}

#### Instadapp Product Launch blog for Compound III

{% embed url="<https://product.instadapp.io/compound-III>" %}


# Using Compound v3

Learn about the specific functions and features for Compound v3

### Market Selection

You will find a button that allows you to switch between v3 Compound markets. *O*n Compound v3, the market determines which asset can be borrowed.&#x20;

<figure><img src="/files/w4OpZg4KArBd2xy9AnER" alt=""><figcaption><p><em>For example in the USDC market you supply other assets and borrow USDC.</em></p></figcaption></figure>

### Lender or Borrower

Compound v3 markets will only allow you to lend or borrow, but you will not be able to to both.

#### Interest earning are only available to the Base Asset

Compound v3 markets do not generate interest on collateral, instead only supplying the base asset generates interest in-kind. For example USDC can be supplied and earns interest in the USDC Market, ETH can be supplied in the ETH Market and earns interest in ETH, etc.

<figure><img src="/files/Ypg0U4tnWOyysXqrdSe6" alt=""><figcaption><p>You can supply USDC to earn interest, remember other assets do not earn interest.</p></figcaption></figure>

Remember you can always create another DSA Account associated to your same address, so you can use the additional Compound account and have one dedicated as borrowing and one as lender.

<figure><img src="/files/9aqgnH9xTCh0veEaTI3n" alt=""><figcaption><p>You can only payback and borrow if you already have a debt in the base asset</p></figcaption></figure>

### Strategies for Compound v3

Supercharge your Compound v3 account with access to Instadapp's popular strategies

<figure><img src="/files/GGV3Co13Cm4VRp1YV1wy" alt=""><figcaption></figcaption></figure>

On Compound v3 the debt is always in the base asset. Here are descriptions of the flashloan powered strategies:&#x20;

**Leverage:** This will borrow the base asset and resupply with the selected collateral, creating a leverage.&#x20;

**Save/Unwind:**  This will sell the collateral to repay the debt owed in the base asset. Use this to close your account in one transaction.

**Collateral Swap:** This strategy swaps the underlying collateral in the position for another asset. This allows you to swap assets within your Compound position.

### Other notes on Compound v3:

* Remember collateral assets supplied do not gain interest at any time. If you are not borrowing against your collateral assets they are simply sitting in the Compound protocol.
* When you are liquidated on Compound v3 your entire position will be returned to you in USDC, you will get the earn rate for USDC but all supplied collateral will be sold to USDC.
* Instadapp team plans to continue to innovate on Compound v3!
* Interest rates on Compound v3 are more governance driven so it may be good to stay connected on social. Instadapp Discord has a DeFi feed which pushes annoucements from Compound.


# AAVE


# AAVE Protocol Explained

Description of the AAVE protocol

## Changes in AAVE version 3

### High-Efficiency mode <a href="#d65b" id="d65b"></a>

This update aims to provide users with **the highest borrowing power out of their collateral**. This feature restricts borrowers to borrow only the assets belonging to a specific category or pool, consisting of correlated assets (e.g., stETH, sETH, alETH), generally the assets that are derivatives of the same underlying asset. This helps the user by giving better predictability and providing better health factors with increased collateral factor and a super low 1% liquidation penalty.

### Borrowing and Supply Caps

AAVE v3 introduces supply and borrow caps allowing governance to better manage risk and to limit exposure to riskier assets. AAVE v3 also introduces a borrowing pause feature, which allows markets to be disabled but not liquidated.

### **Portal** <a href="#id-33d2" id="id-33d2"></a>

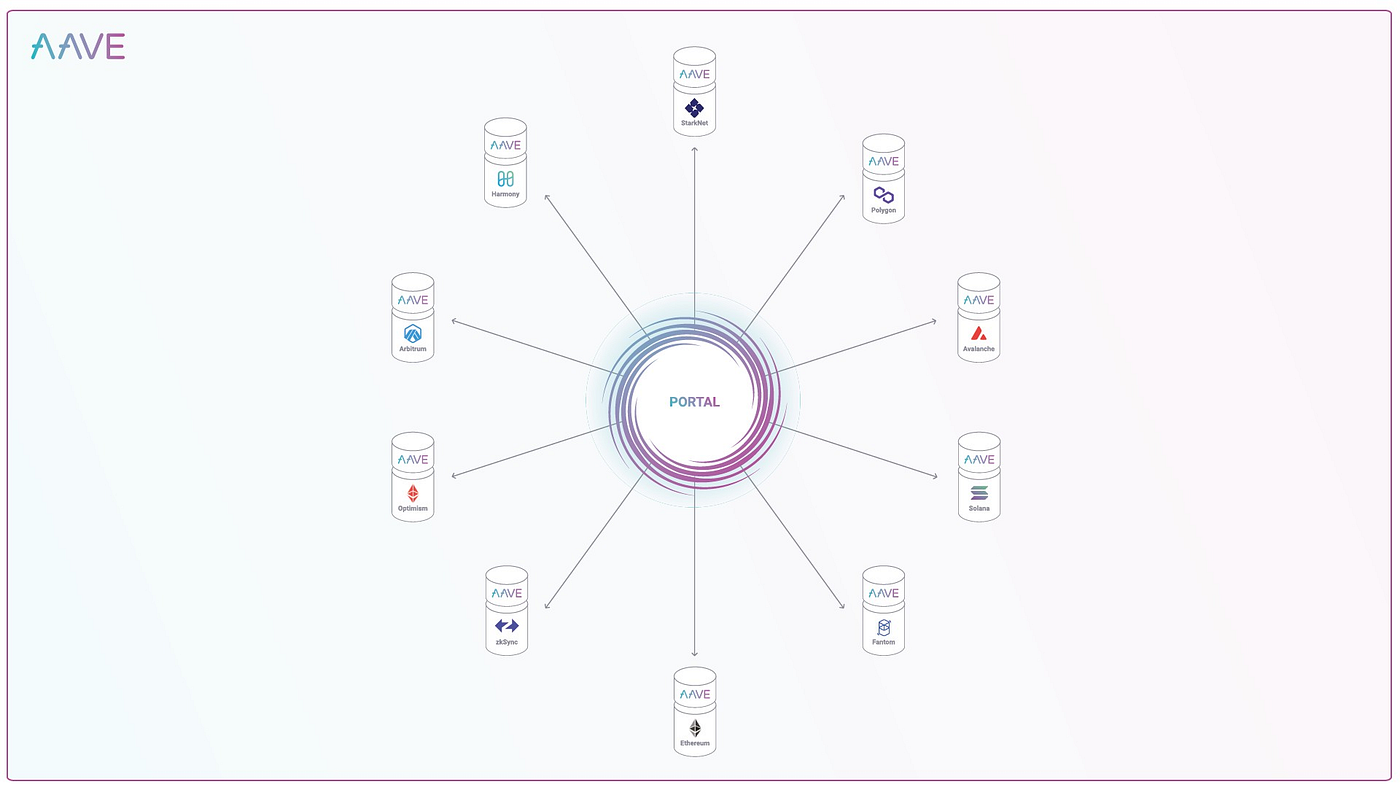
As the blockchain industry is growing day by day, and many chains have come up with new features, it is still difficult if someone wants to shift their supplied assets or aTokens from one chain to another (e.g. Mainnet to Polygon). The AAVE protocol has come up with a new feature to deal with this issue. **AAVE Portal creates bridges between the different iterations of the AAVE v3 protocol on different chains, helping users move supplied assets or aTokens from one chain to another.**

<figure><img src="https://miro.medium.com/max/1400/1*3iyHjyP2DqzuUMg0eVfhzA.png" alt=""><figcaption></figcaption></figure>

### **Isolation Mode** <a href="#id-9358" id="id-9358"></a>

**Isolation Mode makes listing new assets easier for the protocol.** When a new token is listed in the Isolation mode, users can only borrow Stablecoins using it as collateral. While doing this, the user’s collateral should only consist of the Isolated token. **This will allow the AAVE protocol to more quickly list newer or riskier assets while minimizing the risk to the overall protocol.**

<figure><img src="https://miro.medium.com/max/1400/1*dmtl3KWsL-W8Ag-jo-STyA.png" alt=""><figcaption></figcaption></figure>


# How to activate E-Mode

How to activate E-Mode on the AAVE v3 interface

### Turning E-Mode ON <a href="#a0c6" id="a0c6"></a>

This section will introduce you AAVE V3, how to navigate to the AAVE V3 page and turning E-Mode ON for your desired category.

Open the AAVE v3 protocol page. Click on **E-Mode** to list all the categories present.

![](https://miro.medium.com/max/1400/0*QOzSLrF4_q8Ngkye)

Find the category you would like high borrowing power for.

![](https://miro.medium.com/max/1400/0*0tY-nmkMyDNUWNFM)

As you can see, currently, two categories are listed here more will be added overtime.

1. All — This is the **default mode** set. It means that you have **access to borrow all tokens** depending on your collateral value. This is AAVE's standard operation.
2. Stablecoins — **This mode allows you to borrow selected assets with 97% of collateral value.** This means if you deposit 100 DAI, You can borrow up to 96.99 USDC or USDT.

{% hint style="info" %}
Selecting the Stablecoin E-Mode will make AAVE restrict your borrowing power to only Stablecoins; however, you will still be allowed to supply other assets not under this category like Matic, but you cannot borrow them.
{% endhint %}

Select your desired E-Mode by clicking on it. We will be selecting the Stablecoins category for now.

![](https://miro.medium.com/max/1400/0*tHhx2Et4aT9NgrDt)

Approve the transaction to enable your E-Mode.

![](https://miro.medium.com/max/1400/0*NCM_z0t-ylFPDFAu)

You will now see the ‘Enabled’ label on your selected category.

![](https://miro.medium.com/max/1400/0*PPwFuoRhRzKMAkFY)

If you activated Stablecoins you will now see the Collateral Factor of the Stablecoins will be changed to 97% for all Stablecoins. When setting the account on E-Mode you will restrict that account to that mode. If you would like to utilize multiple E-Modes you can create another DSA.


# Migrate from v2 to v3

Learn how to migrate from AAVE v2 to AAVE v3

You can migrate your AAVE v2 position to AAVE v3 on networks which have both versions deployed. Currently for Polygon and Avalanche

{% hint style="warning" %}
Avalanche Migration to v3 has restrictions with USDT.e and USDC.e and does not support upgrading so please remove these assets prior to upgrading
{% endhint %}

## **Aave Migration** <a href="#c4a0" id="c4a0"></a>

You can find the migration tool under the Utilities section on the left panel.

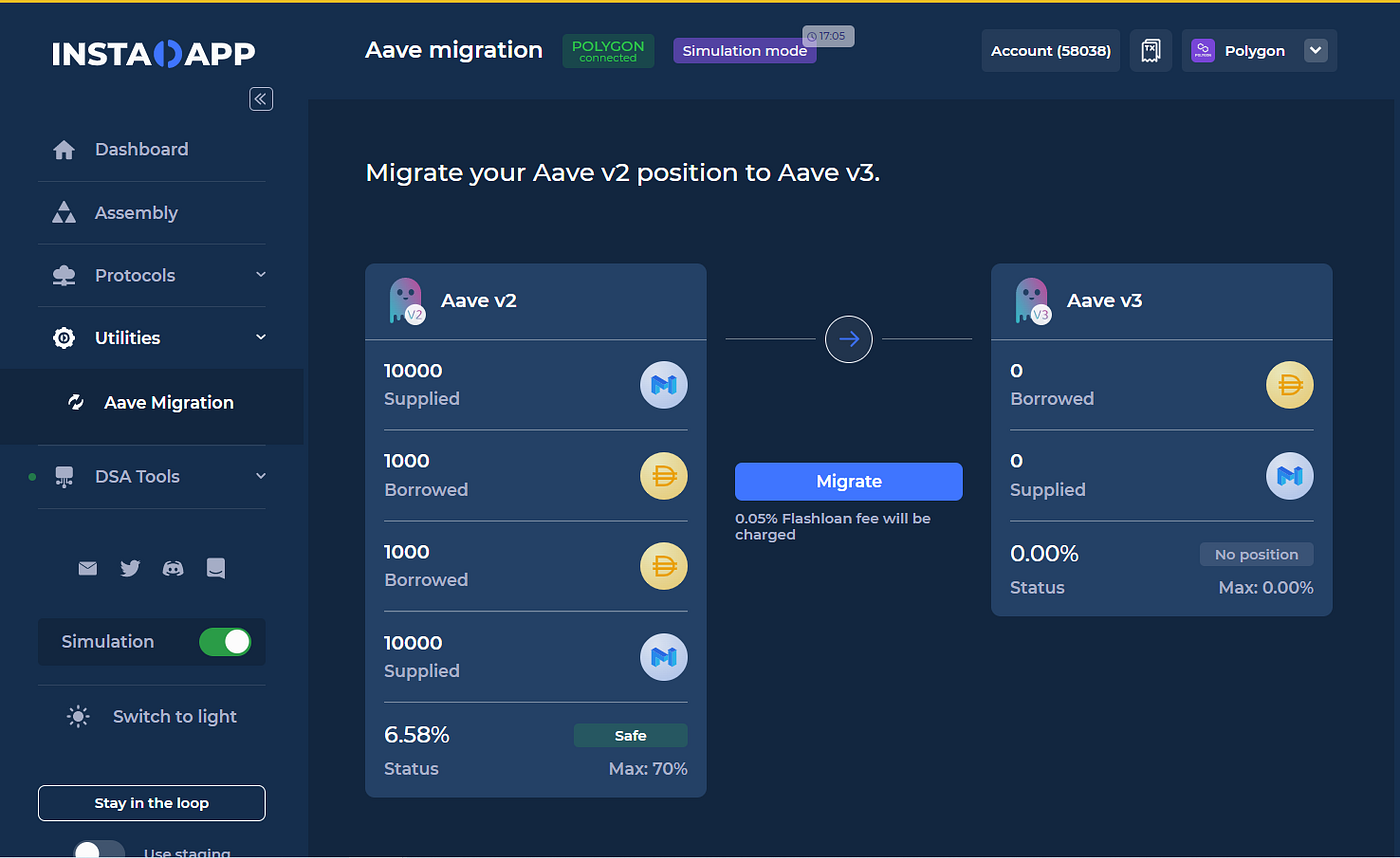
We make use of the **Flash Loans to help you migrate** your position completely from V2 to V3 in one transaction! We charge our standard flashloan fee of 0.05% for the transaction.

<figure><img src="https://miro.medium.com/max/1400/1*Q2QMzSH8Y40ZpdWQ6YzsOg.png" alt=""><figcaption><p>Using Refinance feature (“Aave Migration”) to move position from V2 to V3</p></figcaption></figure>


# Get more E-Mode Accounts

Use DSAs to generate additional E-Mode enabled accounts

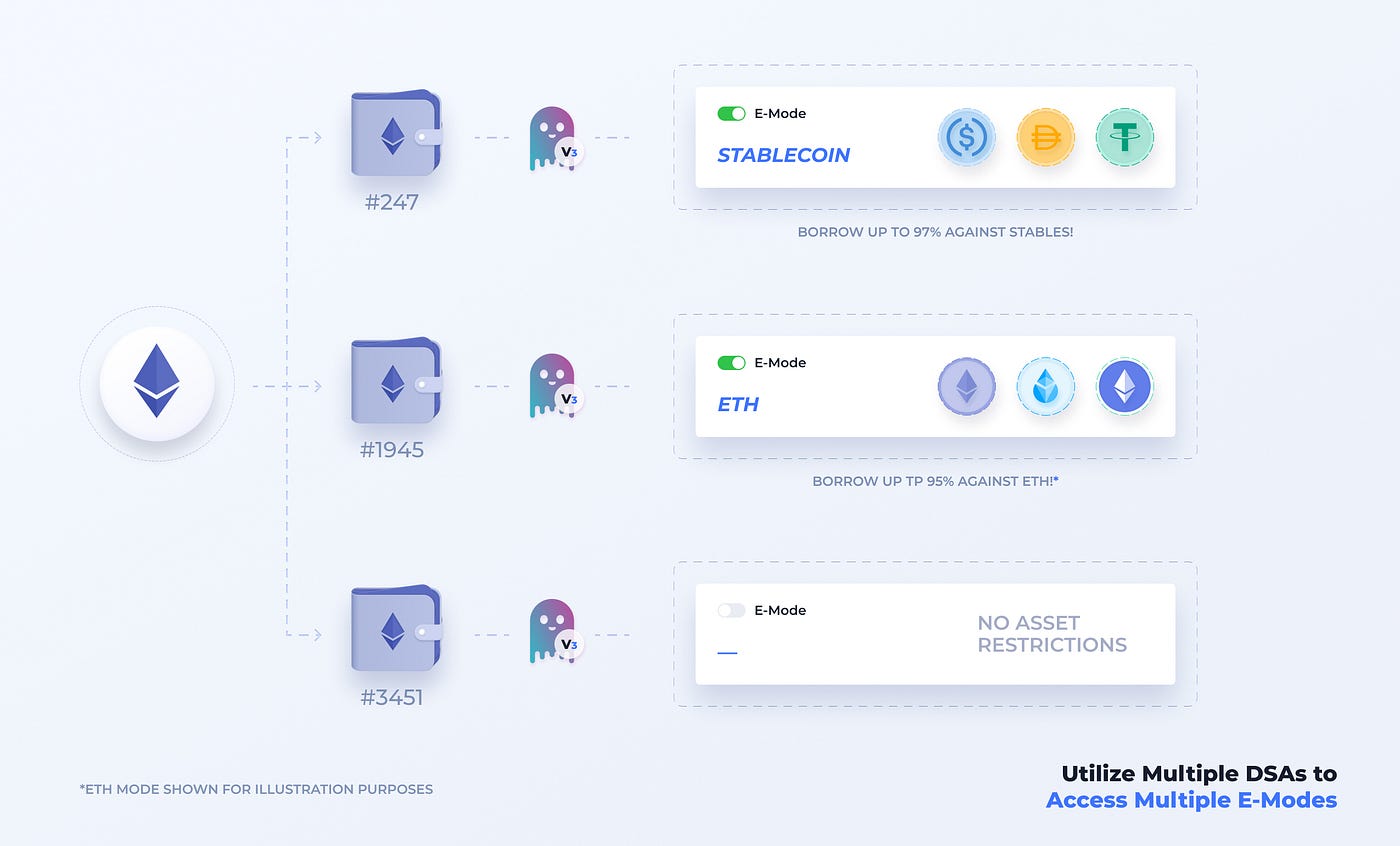
You can utilize multiple DSA accounts to use and access multiple versions of E-Mode enabled AAVE positions.&#x20;

<figure><img src="https://miro.medium.com/max/1400/1*wFeRr7YTOoVWqQidNSIpvA.jpeg" alt=""><figcaption><p>Your EOA can own an unlimited number of DSAs</p></figcaption></figure>

**Each DSA functions as an individual account** for all the protocols on Instadapp. For example, if you have three DSA’s linked to your wallet and all those three DSAs each have their own addresses, and they act as three separate accounts for the AAVE protocol. ***This is because AAVE is account based, and treats each address as one account to its protocol.***&#x59;ou can have multiple DSAs linked to your primary wallet, and you have complete access to all three.&#x20;

By utilizing multiple DSA accounts you can have each DSA handle one of the different E-Modes each! Not only is this better for managing more assets, you are able to get the most out of E-Mode and your assets!&#x20;

## Breaking the E-Mode restriction using multiple DSA <a href="#id-391a" id="id-391a"></a>

High-Efficiency Mode or E-Mode is one of the main features that has been introduced in the V3 of AAVE. You will have a higher borrowing power if you collateralize and borrow the assets that are **derivatives of the same underlying asset**, thus correlated in value. But to make use of this, all of your **borrowed assets must be of the same category**.

<figure><img src="https://miro.medium.com/max/1144/0*aSoR7mw8m1PPCcpJ" alt=""><figcaption></figcaption></figure>

For example, in the image above, to choose the stable coin category, you will have to have all your borrowed assets to be in DAI, USDC and/or USDT to enjoy the fruits of 98% Collateral Factor and 1% Liquidation Penalty. But that poses restrictions over your assets. You just cannot borrow and supply other assets when your E-Mode is ON


# Uniswap

Learn about Uniswap

Uniswap is the largest decentralized exchange with volumes comparable to the largest centralized exchanges. Uniswap is designed as an open protocol where any one can pair and create liquidity and markets.

![](https://upload.wikimedia.org/wikipedia/commons/thumb/5/5a/Uniswap_Logo_and_Wordmark.svg/800px-Uniswap_Logo_and_Wordmark.svg.png)

### What is Uniswap?

Uniswap is a censorship-resistant, transparent financial infrastructure for Ethereum that allows anyone to develop new markets, supply liquidity, and construct financial applications that were previously impossible to build. Uniswap is one of the most popular decentralized exchanges (also shorten to DEX) for cryptocurrencies.&#x20;


# Uniswap Protocol Explained

Description of the Uniswap Protocol

To begin, let’s recall what DEX is. Decentralized exchanges (DEX) are a sort of cryptocurrency exchange that enables secure online peer-to-peer cryptocurrency transactions between two exchanging user wallets without the involvement of a middleman. Decentralized exchanges take a unique approach to buying and selling digital assets by relying on self-executing smart contracts allowing for quicker trades at a lesser cost than centralized crypto exchanges. The 'Constant Product Market Maker Model' distinguishes Uniswap from other decentralized exchanges. Because of this pricing method, any ERC20 token can be exchanged on the exchange as long as it is funded with the same amount of ETH.

#### Liquidity Pools

The liquidity pools are the next key aspect to understanding how Uniswap works.&#x20;

Liquidity refers to the availability of assets in a market and is essential for any decentralized exchange to function properly. There is no way to discover an asset's price without significant liquidity and this could affect the trading of tokens. In essence, Uniswap allows users to create a dedicated exchange for any ERC20 token by constructing an exchange contract that contains both ETH and the token's liquidity pool. Users must fund a pool with an ERC-20 token and an equivalent amount of ETH to become a liquidity provider (LP). Let’s walk through the inception of the ETH/DAI market. So, if the price of ETH is $1000 and the price of DAI is $5, a user would have to contribute 1 ETH and 5000 DAI to the ETH-DAI pool.

#### How does this work exactly?&#x20;

Whenever it is time for a trade, Uniswap essentially balances the tokens in a pool based on the desire to purchase and sell them from users. As a result, any ERC-20 token with the CPMMM equation x \* y = k can be posted and exchanged on Uniswap. "x" and "y" denote the number of ETH and ERC-20 tokens in a pool, respectively, while "k" is a constant. An important detail to note is that the price depends on the size of the order relative to the size of the DAI/ETH reserve. Uniswap’s market-making model will always provide liquidity, meaning reserves will never be depleted.

**Concentrated Liquidity**

![Liquidity on Uniswap v3 is set to price ranges](https://lh3.googleusercontent.com/uJe2RsWTqCHHDgl-p1RPlp1fXqGy0RydA6PWtA0kXzvldb4fCRz0Kg-R94fR_4BKMPpSdrjO4aQBMMa2t0Kgzwggz5TjdkKy-858D4q_J9TvtcMpGkozi6tYVzIc2psCCFVHiEexGwL9hk_hXQ)

Uniswap V3 introduces concentrated liquidity which allows LPs to concentrate liquidity in the target price ranges, achieving much higher capital efficiency. Uniswap V3 allows focused liquidity rather than requiring liquidity providers (LPs) to supply liquidity throughout the entire price range (as seen in V2). In a nutshell, it allows limited partners (LPs) preferences on a price band in which their liquidity is employed.&#x20;

Using the stable coin swap (USDC/USDT) as an example, LPs could deploy capital just inside the two-cent price range (US$0.99–1.01), resulting in more liquidity in the middle price range and higher overall trading fees. Their preferred amount of risk determines their position for that pair. To meet the same amount of risk in the case of very volatile tokens, the range would have to be vast, which in some cases would be almost impossible.&#x20;

LPs don't only deposit their assets in liquidity pools and spread them uniformly throughout the price curve in Uniswap v3. Instead, they get to choose the price range to which they want to assign their assets, and they earn fees when the price falls within that range.

#### Active Liquidity&#x20;

If market prices shift outside of an LP's price range, their liquidity is effectively removed from the pool and no longer earns fees. Until the market price swings back into their chosen price range or they opt to alter their range to account for current values, an LP's liquidity is made up completely of the less valuable of the two assets. It is theoretically feasible in v3 for there to be no liquidity in a certain price range. However, we expect rational LPs to revise their pricing ranges on a regular basis to reflect actual market prices.

The Uniswap protocol is complex and has many parts use the above as a summary of the protocol. Please refer to their official documentation for more information: [Uniswap Official Documentation](https://docs.uniswap.org/)


# Managing Uniswap on Instadapp

The ultimate interface for Uniswap

Instadapp provides the ultimate Uniswap v3 staking interface. Quickly create positions, rebalance in one click and more!  You can start utilizing Uniswap by creating a new position or by importing an existing LP Position.&#x20;

{% content-ref url="/pages/1NmPuZfHaOGGhCbMUHtp" %}
[Creating a Uniswap LP](/protocols/uniswap/creating-a-uniswap-lp)
{% endcontent-ref %}

{% content-ref url="/pages/eKHHu8ffAcj0qLSG8k5J" %}
[Import / Export](/protocols/uniswap/import-export)
{% endcontent-ref %}

### Managing Uniswap LP Positions <a href="#block-1bee28972eec4393bac96cb288dca70a" id="block-1bee28972eec4393bac96cb288dca70a"></a>

In the interface you will find information regarding each NFT’s liquidity, earned fees, its current composition and if it currently in range.

Let's review all the clickable areas of the LP display:

![](/files/WMG16hqffaWuE0t7HYsf)

**A:** Context Menu

**B:** Opens Visual Graph

**C:** Collect Fee&#x20;

**D:** Collect Liquidity Mining Reward

**E:** Unstake Uniswap LP from Liquidity Mining

### Context Menu

This menu will show you all the functions available for your LP. Here you can remove or add liquidity to the current LP as well as access staking and reward options.&#x20;

![](/files/0aHPpL81dTNq03CndeQX)

#### Rebalance Uniswap LP

You can also rebalance your position from this menu. See the following page to learn more about Rebalancing LPs:

{% content-ref url="/pages/JLlhb52SNeH3pbipxYEw" %}
[Rebalancing your LP](/protocols/uniswap/rebalancing-your-lp)
{% endcontent-ref %}

### Better Visualization for LPs

Under each position you will find a \[^] carrot button, this will expand the NFT position screen and display a visualization of the LP Position. You can adjust the view by different time frames or view the positions lower and upper ranges of the position.

![](https://codex.instadapp.io/_next/image?url=https%3A%2F%2Fsuper-static-assets.s3.amazonaws.com%2F52f07785-fab3-4b4a-8409-e5be158d058c%2Fimages%2Ff83fc21b-aa3f-4b1c-a379-7f65b72a887d.gif\&w=3840\&q=80)

{% hint style="info" %}
You can find tags on the visual display which show at asset will compose the position at each range maximum.&#x20;
{% endhint %}

![In this example; when ETH is at $2382 this LP will be 100% USDC](/files/dLFIb0uM9ieoJNI5CwZ1)

### Uniswap Staking Features <a href="#block-678a98f18afc4023ad732d2fd34272fd" id="block-678a98f18afc4023ad732d2fd34272fd"></a>

{% hint style="info" %}
Missing a token? Add tokens to the Instadapp UI to show more rewards and pools. **See** [**Custom Tokens**](/managing-assets/custom-tokens)
{% endhint %}

#### Staking Reward Pools

Uniswap v3 has a built in staking mechanism for different projects and tokens to distribute rewards for providing active liquidity on Uniswap v3. You will find all available Uniswap v3 staking pools towards the bottom of the Uniswap page.

You will find functions in the context menu `[...]` Active Liquidity is any LP that is currently in range. Users need to `Stake` before earning rewards. You can receive your rewards at any time by using `Claim`.

![Staking options can be found on the Context Menu](https://codex.instadapp.io/_next/image?url=https%3A%2F%2Fsuper-static-assets.s3.amazonaws.com%2F52f07785-fab3-4b4a-8409-e5be158d058c%2Fimages%2F89997ba2-4168-4c93-b5cd-e52433e66041.gif\&w=3840\&q=80)


# Creating a Uniswap LP

Learn how to create an Liquidity Position on Uniswap v3

Instadapp offers the best and most robust UI for users to supply their assets in the world's leading DEX, Uniswap. You can start utilizing Uniswap by creating a new position or by importing an existing LP Position. This guide shows how to manage an existing position. For more help in creating your first LP see this guide.

**Create an LP on Instadapp**

You can create a new LP using the Balances in your DSA account. If you never created a Uniswap LP position see this guide for help in creating your first LP.

![](https://lh5.googleusercontent.com/0S9km3YQr-xl8PNxyOWcqaZURqncvE89SeTD_gRpp2XylP18rqF1xclgAeCPIY0vRh5mC5Lccc-FLIPmWMustPkazhMgfKNno_x_e6wn7Y364LjyOV9i3JyjFmB7v90F5hE7RFk_2nNcRqBv0g)


# Import / Export

Learn how to Import and Export Uniswap LPs

**Import a Position from your connect account**

Import External Position If your connected wallet has a Uniswap LP position you can import it into your DSA in one click.

![](https://lh4.googleusercontent.com/38myzsuIpzfqPK-fsTNQcMaB7UkUAypb54Z3tvNR3ekpDf3b0Sl9OTUJHRiKJso4q9IpKBgj9va9C6sM0RCVbf4SIkgDehv6KFSWSe-nvuOvYU78ljmyL-Kifi1qjv9hSPXrBdt9UmFTtBU8Vw)

#### Export a position back to your connected address

You can also export any Uniswap NFTs back to the connected wallet using the Export button.

![](/files/GAelyj8FsxAit9jfv7ks)


# Rebalancing your LP

Rebalance your LP in one click!

Instadapp is the ultimate UI for Uniswap v3 liquidity providers! Instadapp provides a 1-click rebalance strategy to allow you to rebalance LPs quickly and easily.&#x20;

{% embed url="<https://youtu.be/ACeT0rvDd68>" %}

## Rebalance Strategy for LPs

Whenever your position is out or range you will be shown the Rebalance button. You just click on Rebalance button to pull the Rebalance panel. You can set a new price range entering numbers or utilizing the graph.

![](https://lh5.googleusercontent.com/dSjwvwKcFZMMONVTeTK8KqoYzsjXkP5RkEwIJHugfOLFz6JutgUD7wvnqGHs8Cd6A8a0lL-KnUnfKhf9oo_WtgIcnfv74YsokbRsycHNaIhapGE0sVuNPLTs7msg5vd816BCF0JGUu_YB1r2rw)

### Reinvest Fees Option

Instadapp can also reinvest any accrued fees during the rebalance; simply click on `Reinvest Fees`That’s it, now you get your position back in range by just hitting the Rebalance button and confirming the transaction from your wallet.

#### Are there any fees to use?

Same to other strategies we provide for lending protocols, Instadapp utilizes a flashloan to rebalance your position. Flashloans charge 0.05% for any flashloan amount used.


# How to Create Uniswap Rewards

Learn how to create Incentive Farming rewards for any pool on Uniswap v3

Uniswap v3 includes a pre-built uniswap v3 staking reward contract known as the Uniswap Staker contract.&#x20;

### ***Creating a new Reward pool (MATIC/USDC Pool with MATIC Rewards)*** <a href="#id-22f8" id="id-22f8"></a>

Lets learn how the pool’s liquidity providers can get reward tokens by keeping their liquidity position staked. We will create a pool with MATIC as the reward for Liquidity providers.

i) Click on ‘New Reward’ button and select the pair on which you want to give rewards. For example, we want to reward people who provide liquidity to the MATIC/USDC pool, and we select MATIC and USDC in the “Select pair” section.

{% hint style="info" %}
**Are you a team or protocol that wants to launch rewards on Uniswap v3?** \
**See our one pager here ->** [Uniswap v3 Incentive Tool](https://instadapp.notion.site/Uniswap-v3-Incentive-Tool-8569a945e77740e38ce0790fc7d8a7cf)
{% endhint %}


# Staking Uniswap LPs for Staking Rewards


# Liquity

Learn about the Liquity protocol

Liquity is a new decentralized borrowing protocol designed to generate unprecedented liquidity against ETH as collateral!

![Issuing Liquidity interest-free was never so easy and smooth!](https://instadapp-labs.intercom-attachments-1.com/i/o/466165011/db45b9533de59d502c8576a9/1-i4wlA3hTa9ujxifF_Rcvzw.png)

### What is Liquity?

Liquity allows you to draw 0% interest loans against Ether used as collateral. Loans are paid out in LUSD — the protocol’s native stablecoin which is pegged to the US Dollar and need to maintain a [minimum collateral ratio ](https://docs.liquity.org/faq/borrowing#what-is-the-minimum-collateral-ratio-mcr-and-the-recommended-collateral-ratio)of only 110%.\
\
Also, the loans are secured by a LUSD [Stability Pool](https://docs.liquity.org/faq/stability-pool-and-liquidations) and by fellow borrowers collectively acting as guarantors of last resort. Liquity as a protocol is noncustodial, immutable, and governance-free.


# Liquity Protocol Explained

Description of the Liquity Protocol

### LUSD: The Autonomous Stablecoin&#x20;

Unlike other stablecoins, For the underlying collateral, **LUSD is fully redeemable at face value**. Liquity allows users to mint tokens in a **self-service** manner, whereas other stablecoin systems have complex governance mechanisms which are required to maintain the USD peg by updating fees or interest rates. Liquity has devised algorithmically adjusted redemption and loan issuance fees to support its currency in place of the need for interests and human intervention.

This creates **Better Capital Efficiency due to Lower collateral requirements** and contributes to a **more liquid ETH market** and facilitates Liquity’s integration with other DeFi projects through higher ROI.

### Troves

ETH is locked up by a borrower in a smart contract and a “Trove” (an individual liquidity position) is created. Each Trove is required to have a minimum **collateralization ratio of only 110%**, which is unique to other protocols in the DeFi space. The borrower can then mint LUSD tokens, which are calculated as a debt against collateral. This increased collateral factor enables users to borrow more value against their ETH asset. \
*Eg. For Ether that is worth $100, the borrower can obtain up to 90 LUSD. When the borrower is ready to retrieve their collateral, LUSD can be simply returned by them to the contract to repay their loan and free up their collateral.*

### Stability Pools

High-collateral borrowers and Stability Pool depositors provide stability to the system. They are rewarded for their roles by receiving collateral surplus gains from Troves that are liquidated.\
In addition, the **depositors receive LQTY tokens** as a kickback from front ends. LQTY can be staked in order to earn a proportion of the protocol revenue generated from issuance and redemption fees.

### One protocol, multiple front ends <a href="#h_37d34bd22d" id="h_37d34bd22d"></a>

Liquity is a protocol rather than a platform and is controlled by nobody. As such, it outsources the operation of front ends to third parties that are willing to run a web interface to the protocol, which helps to maximize the censorship resistance and also help bootstrap the network.

Instadapp is one of the frontends for the Liquity protocol but Liquity gains the powerful features of Instadapp making it the premier choice for Liquity users! Instadapp makes it easier for borrowers to leverage their ETH multiple times with a single click. Protecting loans from liquidation is simpler, and cheaper, as borrowers can swap some of their ETH collateral to LUSD to increase their collateral ratio, in a single click!

Learn more about Liquity from their [official documentation](https://docs.liquity.org/).


# How to open a Trove and borrow LUSD

Learn how to use Liquity protocol to generate LUSD against your ETH assets

Enter the Liquity Panel find it under Protocols:

![](/files/h9nRxw35zW7vSyBCiRPe)

Click **Open Trove** to begin. This will open the side panel where you can enter your Trove details.&#x20;

![Opening a Trove will always generate accompanying Debt in the process](/files/ZPQziP6LICw4gvzXGxvO)

Liquity similar to MakerDAO has a **LUSD Debt Minimum**, for Liquity Troves you must borrow up to **2000 LUSD** and *similarly you cannot owe the protocol less than 2000 LUSD*. Liquity also takes adds some additional debt which is returned, see below.

!['Using Liquity you can secure a $20,000 LUSD loan paying only 0.5% in the borrowing fee!'](/files/0RDmqZRpGwpUK7yfwlCE)

{% hint style="info" %}
Liquity limits each Ethereum address to one Trove. If you would like to have multiple Liquity positions; you can create additional DSA accounts.
{% endhint %}

### Trove Details

![The position contains 200 LUSD Debt which is not required when closing the Trove.](/files/iurOeH2tzlzbF1Sj7NOj)

**Liquidation Reserve:** The Liquity Protocol requires all troves leave a gas reservation of 200 LUSD this is only used in the case of a liquidation, this is returned when you close the Trove.

**Borrow Fee:** Liquity borrowers pay the borrowing fee upfront resulting in an interest free loan. This amount is added to your debt whenever you mint LUSD.

**Total Debt:** This is the total debt in the position including the Liquidation Reserve and the Borrowing Fee.

![After creating your Trove find newly minted LUSD in your DSA Balance](/files/vP7Qm5xu3GSaaGcoHMEy)


# How to close a Trove

Learn how to close a Liquity Trove

Open the Liquity page and find **Close Trove** under **Strategies**

![](/files/AZniuFzsZpYV7m9Pbguk)

Note that your Debt displayed under your positions includes the refundable **Liquidation Reservation** as debt, when closing the Trove you will only need the LUSD amount as shown under **Net Debt**

![200 Reserve Amount is deducted from the debt owed when closing Trove](/files/GB8pATD4ljAtAYZy9Cd3)

Click **Close Trove** to close the position; the Collateral is returned to your DSA Balance.

![](/files/RHybkFL7ODw9QnIHOz7o)


# Liquidations on Liquity

How do liquidations work on the Liquity protocol

### How do Liquidations work on Liquity?

Liquidation is needed to ensure that the protocol can cover outstanding debt before a Trove’s collateral ratio falls below 100%. The **Stability Pool** is Liquity’s primary mechanism to *instantly* absorb Troves with insufficient collateral. It is maintained by users who deposit LUSD in exchange for the future collateral of liquidated Troves. When a Trove falls below the minimum collateral ratio of 110%, the system liquidates its debt by burning an identical amount of LUSD tokens held in a Stability Pool. This is unlike lengthy processes existing platforms that auction off collateral, thus facing difficult market situations and further price drops.

### What happens when your Trove is liquidated?

If your Trove is liquidated your Trove will be closed for you this will clear your Trove and you will have no remaining debt. In most cases, a liquidated Trove will be completely liquidated. In some cases you may haves some collateral remainder. See: Claim Redeemed ETH

{% hint style="warning" %}
When Troves are liquidated the entire debt of the Trove is repaid with ETH collateral, in most cases, this will leave no remaining ETH in the Trove.
{% endhint %}


# Supply to the Stability Pool

Supply LUSD to the Stability Pool to earn LQTY and Redeemed ETH

Users who provide LUSD to the Stability Pool will provide the first backstop for liquidations. This process happens autonomously. As Troves are liquidated they are redeemed by the Stability Pool providers using LUSD in the Stability pool; supplies of LUSD will earn Redeemed ETH as Troves are liquidated as well as earn Liquity's token LQTY.

Find the **Stability Pool** under **Your Positions** here you can supply LUSD to the Stability Pool

![](/files/rm3ELuf8MCklyJIRFPXf)

### Two ways to Claim Earnings

There are two options for claiming rewards from the Stability Pool

![When you are ready to claim rewards you have two options](/files/DboPjqt0aid7mP7YM3p9)

**Claim LQTY and ETH:** This will move earned LQTY and ETH to your DSA Balance

**Claim LQTY and move to Trove:** This will move earned LQTY to your DSA Balance and move the ETH to your Liquity Trove.


# Staking LQTY

Stake LQTY non-governance token to earn LUSD fees from LUSD Minters!

Liquity users and stability pool providers earn **LQTY**. **LQTY** can be staked into Liquity contracts to earn a portion of the *Redemption and LUSD borrow fees*.&#x20;

![Claimed LQTY and ETH are claimed to your DSA Balance](/files/iboApS6esAfcGYJX48la)

### Earn LUSD and ETH by Staking LQTY

LQTY staking is not a constant but is derived from activity in the Liquity protocol. LQTY stakers received a share of borrow fees in LUSD as well as ETH gained from redemptions.

The LUSD gained here is created when users generate LUSD, they pay up front a borrow fee that is shared with LQTY stakers.

Redeemed ETH is ETH gained when the protocol 'redeems' the riskiest troves, this is different than the ETH gained from liquidations. You can learn more about how redemption work in the Liquity Docs here - [Redemptions and LUSD Price Stability](<https://docs.liquity.org/faq/lusd-redemptions >)&#x20;

{% hint style="info" %}
**LQTY** is not a governance token, Liquity is self described as 'governance free.' The LQTY token is solely for use in Staking as described above.
{% endhint %}


# Euler

Euler Finance is a lending market based protocol with advancements to listing and risk management process. Euler has the largest array of crypto assets through its permissonless listing process and enables many possibilities for lending and borrowing.

![](/files/bVxJzg8Ba4MIodzrsaIB)

### What is Euler Finance?

Euler Finance advances the lending markets by supporting more complex markets. Unlike previous lending markets, any asset can be listed on Euler as long as it has a liquidity on Uniswap v3. This makes Euler one of the largest lending markets by asset types. To mitigate the risk of differing assets Euler lists all assets into one of three tiers; these determine what functions are available to that token.


# Euler Protocol Explained

Learn about the Euler Protocol

### **Permissionless Listing and Lending Market**

Euler works similar to other lending protocols in the space such as Compound and Maker with advancements in the listing process and risk management. Euler's permissionless listing process makes it one of the broadest crypto lending protocols. The Euler protocol takes into account both sides of each crypto asset, evaluating its value and risk as collateral and similarly as debt; enabling unique self-loans and access to a variety of exotic pairs.

### **Asset Tiers**

In order to balance security, risk and access; the Euler protocol identifies each asset as one of the following tiers. These tiers determine how the asset can be utilized for example riskier assets may be lent but not borrowed against, etc.&#x20;

**Collateral Tier** The gold standard! You will find some of the most liquid crypto assets here like ETH, WBTC, USDC and DAI. These assets can be lent, borrowed against, and can be combined with different asset pairs similar to assets on other lending protocols.  \
\
**Cross-Tier** These assets can be lent to the protocol but cannot be borrowed against (they yield no collateral factor) you can borrow multiple asset types from this tier.  This can \
\
**Isolation Tier** These assets similar to Cross-Tier do not have collateral factor and cannot be borrowed against; however you can borrow these assets as the only debt in a position. Eulers specialized asset tier lending platform requires Euler built into their protocol the ability to access more accounts to get the most of the differing tiers; Euler supports up to 256 accounts per address and each owner address can have any number of DSAs, thats unlimited accounts for ya! <br>

![Every asset on Euler will be labeled to show its Tier](/files/2Hp8XzSYf9oP20PPFTJx)

### **Euler Sub-Accounts**&#x20;

To better manage the differing limitations and combinations presented by the tier asset system, Euler allows each address to create sub accounts.&#x20;

When accessing the Euler page you will find your Euler position starts with a default '*Main Account'* and you can create more accounts within your Euler account. You can utilize multiple accounts to better manage your Euler positions such as creating different accounts to use with different tiers etc.

### **Risk Adjusted Borrowing and Borrowing Factor**

Euler adjusts risks for each asset and collateral combinations; to solve for this Euler separates out the collateral factor and the borrowing factor. For example USDT is a cross tier asset it has no collateral factor so it cannot be borrowed against but has a 0.5 borrowing factor meaning you can borrow USDT at 50 cents on the dollar against the collateral value of the account. This more detailed approach to risk allows Euler to offer higher collateral factors than other lending protocols.

### Learn more about Euler

The Euler protocol offers many more features and unique properties that power its protocol; above represent the most salient features from a DApp user prospective. Find more links for Euler below:

#### Check our the Euler Whitepaper

{% embed url="<https://docs.euler.finance/getting-started/white-paper>" %}

#### Instadapp Product Launch blog for Euler

{% embed url="<https://product.instadapp.io/euler-finance/>" %}


# Using Euler

Overview of Euler specific options on the Instadapp Interface

The Euler interface works similar to market based lending protocols on Instadapp like Compound and AAVE. You will find access to standard operations like supply and borrow as well as access to our famous strategies to quickly leverage, swap debt and get the most of Euler!&#x20;

Euler is a unique protocol with some advanced features read below to learn about Euler specific features on the protocol page.

### Opening the Euler Protocol Page

You can find Euler on the left navigation panel under Protocols

<figure><img src="/files/42pAwUUYol2mXpmfvcEN" alt=""><figcaption></figcaption></figure>

### Sub-Accounts

Euler uses multiple accounts to manage positions each user will start with an initial account labeled 'main account.' You can create up to 256 sub-accounts. If you would like to add an account click the Account dropdown and click `New` *(Note: Sub-Accounts do not require a gas tx before use)*

<figure><img src="/files/BjNicA0RAIBp0Xyk6ctd" alt=""><figcaption></figcaption></figure>

### Collateral Factor and Borrowing Factor

Euler assets have their collateral and borrowing factors separated to better manage risk across the differing asset tiers. You can find these values on the asset window

<figure><img src="/files/C9ZppuoePqZGhV4qNUHC" alt=""><figcaption><p>You'll find B.F on the Euler interface representing Borrowing Factor</p></figcaption></figure>

On the Euler protocol Collateral Factor determines how much collateral the protocol will loan against that asset, but each asset also has a Borrowing factor which determines how much debt of that asset you can have. This dual risk approach better accounts for risk in the Euler protocol and allows it to offer wide array of loans.

<figure><img src="/files/YRmFU7kGDpIzbpVmTg3H" alt=""><figcaption><p>Example of borrowing USDC against different Collateral Factors</p></figcaption></figure>

### Utilizing Sub-Accounts

Euler separates their assets into tiers. You can borrow and lend a larger variety of assets with some limitations.&#x20;

**Collateral Tier:** These assets can be lent, borrowed against, and can be combined with different asset pairs similar to assets on other lending protocols.  \
\
**Cross-Tier:** These assets can be lent to the protocol but cannot be borrowed against, they can be borrowed in combinations with other cross-tier assets.\
\
**Isolation Tier:** These assets similar to Cross-Tier do not have collateral factor and cannot be borrowed against; but you can borrow isolated tier assets as the only debt in an account.&#x20;

<figure><img src="/files/Dor9GVOQx3BcA2kKZCnv" alt=""><figcaption><p>Some Examples of Sub-Account configurations</p></figcaption></figure>


# Debt and Collateral Transfer

Learn how to move debt or collateral between your Euler sub-accounts

You can transfer assets and debts between your Euler sub-accounts. You can do this using the Debt and Collateral Transfer function

### Where to locate Debt and Collateral Transfer

You can find this feature in the Strategies tab on Euler

<figure><img src="/files/39MLCFyGBfoMzGWdF8LU" alt=""><figcaption></figcaption></figure>

### Select Collateral or Debt to begin transfer

<figure><img src="/files/75FxhG2yhYthkT6cX6Um" alt=""><figcaption></figcaption></figure>

### Select which account you want to transfer from and to

<figure><img src="/files/8XYCIQ4ygTnONwoMiZZ4" alt=""><figcaption></figcaption></figure>

### Select the asset or debt you would like to transfer and the amount

<figure><img src="/files/8vrlJfftzC1ae2euXO0g" alt=""><figcaption><p>You can also select the MAX option to fully move a collateral or debt</p></figcaption></figure>

### Click the Transfer bottom at the bottom to submit the transaction

The display on the bottom will show the estimated risk of both positions. The transfer will not run if either position were to liquidate. You will see a warning message.

<figure><img src="/files/IvLfGXRU8FbEXfhubKmj" alt=""><figcaption><p>You will see two status bars showing both positions</p></figcaption></figure>

Once the transaction confirms the collateral or debt will be transferred to the target sub-account.


# Morpho Optimizer

Learn about Morpho

Morpho is a peer to peer matching protocol that works on top of existing lending protocols like Compound and AAVE.  *Previously called Morpho v2*

<figure><img src="/files/MqxgE0aMP16NKCB2oJTu" alt=""><figcaption></figcaption></figure>

### What is Morpho?

Morpho is a protocol layer built on top of popular lending protocols like Compound and AAVE. Morpho works by directly matching borrowings and lenders while utilizing lending protocols as sources of liquidity. Morpho optimizes the interest rate spreads for both borrowers and lenders.


# Morpho Explained

Learn more about the Morpho Protocol

### Building Better Rates on Popular Lending Protocols

Decentralized protocols like AAVE and Compound work by being accessible at any time, to do this lending markets require overcollateraization of loans and have to maintain high spreads between lenders and borrows to maintain stability in their markets.&#x20;

### Morpho P2P Matching

Morpho makes DeFi more capital efficient by utilizing a Peer to Peer layer on top of lending protocols like Compound and AAVE. This enables both lenders and borrowers to directly connect with one another when there is demand, while maintaining the access and guarantees of the underlying protocol. This guarantees Morpho users the same if not better rates than using these protocols directly.

### How does P2P matching work?

Matching on Morpho occurs automatically! If your supplied or borrowed amounts find a matching peer, your loan or a portion of your loan will be shifted to P2P rates. On the interface you can check the banner to see if your asset is currently receiving the matched P2P rate or the underlying market or a blended rate.

<figure><img src="/files/CfFGJATcjl9fG3zFEBBo" alt=""><figcaption><p>Whenever you are matched you will receive the P2P rate.</p></figcaption></figure>

#### Will I receive protocol rewards?

Yes! You will receive the same rates and the same rewards from any protocols used through Morpho. Morpho may also incentive users with their own token!


# Using Morpho

Overview of Morpho on Instadapp

Morpho works directly with AAVE and Compound and operates nearly identical to using these protocols directly. You will find access to all the same popular Instadapp strategies from 1-click leverage, debt swap and even the ability to refinance between Compound, AAVE and Euler.

### Opening the Morpho Page

You can find Morpho on the left navigation under Protocols

<figure><img src="/files/f3AO4FrIAFtthZVzKKz8" alt=""><figcaption></figcaption></figure>

### Morpho Markets

Morpho operates two markets, one on top of Compound v2 and one on top of AAVE. You can select which market to use in the top right corner. *Not all assets on Compound and AAVE have a P2P market on Morpho.*&#x20;

<figure><img src="/files/GFryzVD0LiANGl3kzQLj" alt=""><figcaption></figcaption></figure>

### Morpho Matching Details

You can see the overall matching efficiency in the top section of the interface. This displays an aggregate matching efficiency. Matching is specific to each asset market, you can find additional information under the asset.

<figure><img src="/files/EUhvJqmQOoJHLRqIEXt9" alt=""><figcaption></figcaption></figure>

If your supply/borrow amount would be matched immediately in your transaction you can find this noted in the info box before you confirm the transaction.

<figure><img src="/files/kqlEfida7BFuYQMsmqMV" alt=""><figcaption><p>In the example above, ETH has borrowing to be matched so supplying ETH will receive the P2P rate</p></figcaption></figure>

#### Matching Details

At any time Morpho will have loans and suppliers to be matched. On the Matching Details panel you can see if supply or borrowing is waiting to be matched and what percentage of suppliers and borrowers are currently matched.

<figure><img src="/files/fTVuFVlyOKwK04l6Js8K" alt=""><figcaption><p>On the Matching Details you can find more information about the current P2P markets.</p></figcaption></figure>

### Autonomous Matching

Morpho autonomously matches borrowers and suppliers. You do not need to be matched at the time when you supply or borrow. Morpho will continue to update and match peers as users enter and exit the markets.&#x20;

<figure><img src="/files/5pcKImWuJyrkD6sbtv7L" alt=""><figcaption><p>This supplier is partially matched which is receiving a blended rate displayed as 'Your APY %'</p></figcaption></figure>

At any time you can review your current APY on the top corner of each asset. Here you can see if the position is receiving the P2P APY, the underlying protocol rate or a blend. When your position is fully matched both borrowers and suppliers pay and receive the P2P rate.


# Morpho Blue

Learn about Morpho Blue

Morpho Blue emerges is a lending protocol, introducing trustless permissionless markets and efficient capital management, revolutionizing the DeFi landscape.&#x20;

<figure><img src="/files/lGFzXJc5irlrVVjPIOyM" alt=""><figcaption></figcaption></figure>

#### **What is Morpho Blue?**&#x20;

Morpho Blue is a new DeFi protocol featuring permissionless lending markets, immutable markets, and liquidity mangement ensuring efficient allocation of capital and capital management.


# Morpho Blue Explained

Learn about Morpho Blue

### **Permissionless Markets**

Morpho Blue is a governance minimized lending market. Assets are whitelisted by governance but markets can be deployed openly by anyone. This enables new use cases for Morpho and will allow the protocol to offer more kinds of asset and markets. Once deployed markets on Morpho Blue cannot be modified and require less overall governance to maintain and run.&#x20;

### Oracle Agnostic

In the same vein as its permissonless markets, Morpho Blue markets have another option that is open to the creator. Morpho Blue markets can determine which price oracle to use. i.g Chainlink, Uniswap TWAP, or even hard code price etc. This enables Morpho Blue to act in a more neutral and open manner by not selecting any particular default oracle.&#x20;

### **Metamorpho Vaults**

Metamorpho Vaults play a pivotal role in simplifying the lending experience on Morpho Blue. Metamorpho is examplery of a use case built on Morpho Blue's open permissionliss markets. Vaults empower risk managers to oversee risk, curate diverse risk profiles, and allocate capital efficiently. For users, vaults enable a way to provide a single asset into Morpho Blue's liquidity earning interest across multiple markets and diversifiying your risk.


# Using Morpho Blue Borrow

Learn how to utilize and create Morpho Blue Vaults

### Where to locate Morpho Blue

You can find Morpho Blue on the left navigation under Protocols and under Morpho Blue

<figure><img src="/files/lNmh7YIsZWVmnVexjP2Z" alt=""><figcaption></figcaption></figure>

#### Market Selection

Morpho Blue markets can be found on the top right, select the market you desired to load that specific market

<figure><img src="/files/imbrWO4o4a42BjIwdwUk" alt=""><figcaption></figcaption></figure>

#### Opening a loan

First supply the collateral asset into the market. This will enable you to open a load. You can find the collateral assets LTV on the top.

<figure><img src="/files/EfyIZqtdO2uBovlWRmlm" alt=""><figcaption></figcaption></figure>

Once you supply your collateral you can now borrow. To borrow click the borrow button to open the panel. Enter your desired borrow ammount and submit the transaction.

<figure><img src="/files/FvzSDGSHNehhORkV6XIc" alt=""><figcaption><p>Review your Position health and projected liquidation price before borrowing.</p></figcaption></figure>

#### Strategies

The following strategies are available for Morpho Blue markets:

* Leverage
* Deleverage
* Deposit and Borrow
* Payback and Withdraw

<figure><img src="/files/kEdGtw8N5u5cY7HKWEV4" alt=""><figcaption><p>Example of a Leverage Transaction</p></figcaption></figure>

#### Learn More About Strategies:

{% embed url="<https://guides.instadapp.io/strategies/using-strategies>" %}

### Morpho Blue FAQs

<details>

<summary>What happens when I am liquidated?</summary>

On Morpho Blue if your position is undercollateralized or passed the liquidation limit, the entire balance can be liquidated. In addition, on some markets there is an additional penalty charged for being liquidated. [*Learn More on Morpho Blue Docs*](https://docs.morpho.org/concepts/morpho-blue/core-concepts/liquidation)[*: Liquidations* ](https://docs.morpho.org/concepts/morpho-blue/core-concepts/liquidation/)

</details>

<details>

<summary>Why are there multiple versions of the same market?</summary>

</details>

<details>

<summary>I am not able to see a particular market on the UI</summary>

Morpho Blue may have an unlimited number of markets the Instadapp UI may not show all the available markets. If you are looking for a particular market and would like us to add it to the UI please contact us. \
\
We recommend using [Avocado Wallet](https://guides.avocado.instadapp.io/) to be able to access Morpho on Instadapp PRO and on any UI offering Morpho Blue so can have more flexibility.

</details>


# Using Metamorpho

Learn about using Metamorpho Vaults

### Where to locate Metamorpho Vaults

You can find Metamorpho on the left navigation under Protocols and under Morpho Blue/Earn

<figure><img src="/files/ONtrOLy6C282WAhJSWXA" alt=""><figcaption></figcaption></figure>

### Earning on Metamorpho Vaults

Metamorpho vaults earn yield/APR from the vaults lending rates  as well as Morpho Rewards to distribution by vault operators.

<figure><img src="/files/coqe9BER764C2LOubWhS" alt=""><figcaption><p>The Net APY is your total rewards including Morpho and any additional incentives.</p></figcaption></figure>

#### Net APY

This value represents the total net APY your deposit is earning across all combined interest rates.

#### Vault APR

The vault represents the APR the vault is generating and how much your deposit could earn. Each vault can participate in a combination of markets and earns this rate from all markets. Vault APRs are subject to change based on usage, utilization and changes into participating markets.

#### Morpho Rewards

Morpho Governance may award additional Morpho rewards to selected vaults. Morpho tokens at the moment are non-transferable tokens.

#### Additional Rewards

Vault operators or Morpho Governance may add additional incentives on top of the vault i.e Lido tokens rewarded to ETH markets.

#### Vault Fee / Performance Fee

Metamorpho vaults are managed by 3rd parties and may include a performance fee. This fee is charged on your earnings.

### Learn More about Metamorpho Vaults

{% embed url="<https://docs.morpho.org/concepts/morpho-blue/>" %}
Morpho Blue: Metamorpho Documentation
{% endembed %}

### Metamorpho FAQs

<details>

<summary>Can I withdraw my deposit at any time?</summary>

In most cases you should be able to fully withdraw your deposit. If there isn't enough liquidity the interest rate model will increase to tick upward encouraging borrowers to repay their loans.&#x20;

Its important to understand the parameters of the markets you participate in. You should consider how much liquidity there is at the moment relatively to how much you want to borrow. This should not be an issue with larger established markets.

</details>

<details>

<summary>Is it possible to lose money supplying?</summary>

Morpho Blue is designed to proactively remove debt however, it is possible to lose money by supplying. If a Metamorpho vault is providing liquidity to a market that defaults before the liquidations process occurs lenders may incur losses.

</details>

<details>

<summary>The Performance fee seems high - is this a yearly APR?</summary>

The performance fee is not a yearly APR but a performance fee charged only on top of what the vault makes not against its total holdings.&#x20;

</details>


# Using Strategies

Description of the Strategies available for

### What are Strategies?

![](/files/gYc7b2VpJbANgsRnAEv3)

Strategies are transaction recipes that allow you to maximize your DeFi assets. Instadapp's powerful SDK allows you to achieve complex DeFi transactions in one click. Many Instadapp strategies utilize the power of flashloans to create financial magic enabling functionality such as leveraging, debt swapping and refinancing.

![Some examples of the available strategies](/files/oLuXv1BsP9DWKGGpkUWT)

### Where to find the Strategy tab <a href="#block-04cdc8825f1b41a3a382f6e1b5f02b60" id="block-04cdc8825f1b41a3a382f6e1b5f02b60"></a>

Within any of the protocol tabs you can find the **Strategies** button on the right-side panel.

![](/files/gp7RZ1O9oDiJsfUCtZsT)

#### Flashloan Fee

Flashloan powered strategies charges a min of 0.05% on the amount used in the strategy transaction. You can avoid this fee by using [Avocado](https://avocado.instadapp.io/).


# Compound Strategies

These strategies combine two or more actions into one transaction.

![](/files/pYPm57r57m3pJ1oNp5tQ)

### Deposit & Borrow <a href="#h_816bf2b5a0" id="h_816bf2b5a0"></a>

This function combines two functions; this will deposit an asset from the DSA balance into the protocol and will also borrow an asset. The borrowed asset will be in your DSA balance.

**Deposit & Borrow Example --**

In the top line you can select the collateral you would like to deposit

![](/files/QbZBTNbcbk71UqY50cfS)

In the lower line you enter what you would like to borrow

![](/files/pyPNBG29VtP44OUoFfRY)

You can change the asset type by clicking the asset icons

![](/files/oG6rbVkbr0jSNiuISJKo)

Submit the transaction by clicking the button at the bottom

![](/files/Vu4LDGjMJ0bg6DlAdclW)

After the transaction confirms you will see both the collateral deposit and the debt owed to the protocol.&#x20;

![The borrowed asset is now in your DSA account balance](/files/v0TGzvdoru0m2DdeSxnJ)


# Leverage / Max Mining

Leverage your deposit to gain increased exposure

The Leverage strategy borrows against a collateral asset and redeposits that newly borrowed asset back to the protocol as additional collateral. Leveraging can be used to gain greater exposure to an asset.&#x20;

### Leverage / Max Mining

When using the Leverage strategy you select a collateral asset and then select the debt you want Leverage against. Leverage utilizes assets already in your position so you may need to supply your initial asset.

Leverage Example --

In our example we think the value of ETH will increase and would like to leverage. We started by supplying ETH to AAVE. This is our starting position:

![We deposited \~0.01 ETH into AAVE](/files/azOsQMVOVkx5d3VUvZil)

Now we would like to leverage our ETH for more ETH. In this example we'll borrow against a stablecoin to leverage ETH. You can click the icon in debt space to change the token you will borrow against.

![You can leverage any token including tokens you are not using as collateral.](/files/vigNhwkOBaAcltPqoNrr)

The Leverage function combines multiple steps in one:

* Borrows against collateral generating debt
* Uses the new borrowed assets and resupplies it to the position
* This can be looped to create increased leveraged

In the input you can enter the amount of ETH to be leveraged this maximum leverage is determined by the protocol and collateral factor of the asset. For ETH you can leverage it about 4x on AAVE. This is an example of a projected leverage.

![Instadapp lets you leverage pass the CF of an asset](/files/7Sh8vRskjtHPDxa4IDKT)

For our example we'll leverage the position about 2.5x. In the Leverage panel we'll enter the amount of the debt asset we want to use to leverage. In this case $25 USDC is borrowed against and then swapped and resupplied as ETH into our position.

![You can see the projected status of your position before you execute it.](/files/okfo0QbRvdEp4IjAKnvZ)

Once the transaction confirms you have a position that looks like this:

![](/files/JRNWlOg6nb43B0GzWxxA)

![](/files/RifZYNIj9FyOyFWrMk3P)

Alternative Use


# Save / Unwind Mining

Save strategy or Unwind strategy will take your collateral within a position and use it to pay back debt. This can be used to close a leveraged position or pay any debts within the position.

### Save / Unwind

When using SAVE you select a collateral from your position and a debt in your position to payback.

**Save Unwind Example --**

When you open the Save / Unwind panel the interface will automatically select collateral and debt options. In this example we have a position with ETH collateral and USDC debt.&#x20;

We can use the Save strategy to payback the USDC debt in one click. In this example we only have one kind of collateral and one kind of debt so the options are populated for us.

![The UI automatically selects from available assets and debts](/files/L5k6zJ0GKzMmQreiQLHG)

If we had two kinds of collateral or debt we could select between them by clicking on the icon:

![When you have multiple assets you can select which assets to unwind](/files/f1gDO2t2rIPHBXUFR9YV)

The Save function combines multiple steps in one:

* Withdraws Collateral Asset
* Swaps Collateral Asset for Debt Asset
* Pays down Debt

In our example this strategy withdraws ETH swaps it for USDC and pays down the USDC debt.&#x20;

One of the things you may have noticed is when using the unwind strategy you can enter a value that is higher than the debt you owe, any excess unwind will be sent to your DSA balance.

![](/files/yFZlQALW7V0IeAZbpT3o)

In this case we want to fully withdraw the collateral after unwinding, so we enter a slightly higher amount to payback to make sure no debt is remaining.

![The amount entered is in the collateral asset, the underline will show its converted value.](/files/YSIoHOtwV7SBIKBd6pho)

After the save transaction confirms we will find our debt has been cleared a small excess from the SAVE transaction is in the DSA Balance.

![Now we can withdraw the entire ETH supplied to AAVE](/files/xQpTk41nlIUJcwxnkNq2)

Now we have no debt on AAVE and can withdraw the entire ETH balance we supplied to AAVE.


# Collateral Swap

Collateral Swap allows you to swap the underlying collateral within the protocol allowing you to swap your balances without leaving the position. This can be useful if you want to trade within your position or if you wanted to swap collateral to increase your positions collateral factor.

Collateral Swaps are powered by flashloans and are subject to a small flashloan fee.

### Collateral Swap


# Debt Swap

Swap the underlying debt in a position

Debt Swap allows you to swap the underlying debt within a position. You may want to do this to refinance your debt and obtain a better rate. In more complex scenarios you could utilize this strategy to execute a short. **See:** [**Using Strategies to short an Asset**](/strategies/alternative-strategies#h_64bf41a334)

### Debt Swap

When using Debt swap you select one of your existing debts and then select a new asset to swap that debt into.

**Debt Swap Example --**&#x20;

In this position there is only WBTC debt so the UI has selected the WBTC. If you have debts in multiple assets you could click the WBTC icon on the right side panel to select another debt.

![](/files/91ReOzvwFm15JGUN2Q9M)

The UI has started with DAI selected but we can change this by selecting the DAI icon. In this case we want to swap the WBTC debt into USDC debt.

![](/files/9NaxaletiPJIiklt4CtM)

Once you selected the desired assets now you can enter the amount of debt you want to swap.


# Alternative Strategies

Alternative uses for Strategies

Strategies are labeled for what they are most used for, however these strategies can be used to achieve other desired results.

### Using Strategies to short an Asset <a href="#h_64bf41a334" id="h_64bf41a334"></a>

A user who has debt dominated in dollars and believes that the BTC price is going to fall could use a **debt swap** to swap their existing USD denominated debt into BTC debt, the USD price loss in BTC then acts as a short against BTC minimizing your USD debt owed, once the BTC dollar price falls, swap the BTC debt back to dollar denominated debt.\
\
Swap the USD denominated debt, this could be DAI or USDC for example; and complete a debt swap to convert that debt into WBTC. When the price of WBTC falls in USD value; complete another debt swap to convert the difference and reduce the amount owed in USD.

### Using a Leverage to acquire an asset

Not all leverages need to be doubling down on the collateral; you can set the Leverage Strategy to borrow any asset you like. For example if you have 1 ETH as collateral you can use the Leverage strategy to borrow DAI and resupply WBTC, now you have WBTC in your account you acquired against you ETH collateral. y

### Using Strategies to create a Credit Based Trading Account

For the savy trader; you can use a lending protocol as a 'self managed' credit line and trading account by utilizing collateral swaps execute purchases and sales. In this example a user deposits stablecoins into their AAVE account and generates loans through Leverage strategies, and utilizes Save Strategies to lock in profits. They can also use Collateral Swaps to buy assets within their lending position so as they buy assets those assets immediately can be immediately borrowed against.&#x20;


# Voting and Governance

Information on Instadapp Governance

Instadapp is governed by the INST token. INST can be used to vote both on-chain and off chain.

## Atlas: On-chain voting  <a href="#block-c557d6521d69447d9b48011e757b49b3" id="block-c557d6521d69447d9b48011e757b49b3"></a>

For on-chain governance, INST holders can allocate their governance power and vote using the Atlas Governance dashboard.&#x20;

<figure><img src="/files/zttCFsJAtWEgSwXptQZ0" alt=""><figcaption></figcaption></figure>

#### Atlas Homepage:

{% embed url="<https://atlas.instadapp.io/>" %}

## **Snapshot: Off-chain voting**

For off-chain voting we utilize Snapshot. Snapshot votes will count all tokens in your balances and any tokens that are delegated. *Your tokens do not need to be delegated to vote on Snapshot.*

<figure><img src="/files/OPe3iGXZxiwtTo15oiN0" alt=""><figcaption></figcaption></figure>

**Instadapp Snapshot Dashboard**

{% embed url="<https://snapshot.org/#/instadapp-gov.eth>" %}

#### Read more about Instadapp mechanisms: <a href="#block-c557d6521d69447d9b48011e757b49b3" id="block-c557d6521d69447d9b48011e757b49b3"></a>

{% content-ref url="/pages/6ewQOTCGhqCEX8WPJAQb" %}
[Atlas](/governance/atlas)
{% endcontent-ref %}

{% content-ref url="/pages/EgGWIOuONDuXNrcCgWJC" %}
[Snapshot](/governance/snapshot)
{% endcontent-ref %}


# Snapshot

Learn how to vote on off-chain voting using Snapshot

## Using Snapshot to Vote

Snapshot is a gas-free platform for off-chain voting system for DAOs. Instadapp governance uses Snapshot for off-chain proposals, community signaling, and protocol parameter changes.

## How Snapshot works? <a href="#block-ba77e32ee4f74644bc02700caa50b467" id="block-ba77e32ee4f74644bc02700caa50b467"></a>

Snapshot enables users to sign a message to verify and accept their voting power, eliminating the need for a transaction. Vote with tokens in your EOA address using Snapshot.

Instadapp Snapshots generally run for 3 days. Snapshot votes are announced on Discord and on the Instadapp Governance Forums.&#x20;

## Voting Day <a href="#block-a9160eb1bc814e40bfb341aded12e7ca" id="block-a9160eb1bc814e40bfb341aded12e7ca"></a>

Once a Snapshot vote is open you go the the snapshot site and login with your wallet. Locate the active proposal. Carefully read any related links and information and go to the bottom to place your vote.

![Scroll to the bottom to vote!](/files/gBShyRnDGQrnJWWrGcVE)

### Delegating INST in your DeFi Smart Account <a href="#block-f90a361ff3b0472f8e692c4931337828" id="block-f90a361ff3b0472f8e692c4931337828"></a>

In many cases you may want to utilize the INST within your DSA to vote. You cannot sign messages with the DSA so you can delegate this INST to an EOA address like Metamask. Find the Delegation page in the menu under DSA Tools.

![You can find the Delegate tool under DSA Tools](/files/igO8tdbJc155C0vWlTfj)

{% hint style="success" %}
Remember you don't require any gas to vote on Snapshot! Just a signature from your address so delegate to an EOA address you can sign messages with ✍️
{% endhint %}

## Snapshot Voting Parameteres

<figure><img src="/files/9Saxh1W6t1EKvjcWNf8u" alt=""><figcaption></figcaption></figure>


# Atlas

On-Chain Voting Dasboard

## Atlas: Voting Dashboard

Atlas is used for on-chain voting. Before voting with INST you must first delegate the tokens voting power. *(You do not need to do this for off-chain Snapshot voting).*

![](/files/tWsnSQIVUEnWyjzv66hh)

## Delegating Voting Power

Once connected click your address to find your profile. On your profile page find the Change Delegation button to begin.

<figure><img src="/files/XfQQHrYHp1twrfbVSEtu" alt=""><figcaption></figcaption></figure>

### Select Delegate Voting

You can delegate your voting power or reset your delagations here.

<figure><img src="/files/ZWc6CAdwtqYTpVfbZdpc" alt=""><figcaption></figcaption></figure>

### Delegate Voting Power to Self

To delegate to self simply paste in your own address. The UI will confirm you are delegating the voting power to yourself in the blue text.

<figure><img src="/files/2SSX9XPojMrIk2fYQw9c" alt=""><figcaption></figcaption></figure>

## Atlas Voting Parameters

<figure><img src="/files/TRkgVXoyOQqgK1NxkdHt" alt=""><figcaption></figcaption></figure>


# Refinancing to Morpho

Learn how to Refinance to from AAVE and Compound to Morpho

### Migrate from native Aave v2/Compound V2 to [Morpho-Aave](https://defi.instadapp.io/morpho) on Instadapp

If you have a position on the native Aave v2/Compound V2 protocol and want to migrate your position to Morpho to received optimized rates, here are the steps you should follow:

1. **Create a DSA:** If you don’t already have a DeFi Smart Account (DSA), it’s time to create one. Head to [Instadapp](http://defi.instadapp.io) & click on ‘Create Account’

<figure><img src="https://lh4.googleusercontent.com/hc6c8NrZX2svoKtFDXLONDRAC5dpGgSJibsHiSU0UFZelq4WbQr_jzMRjztDyACS2gan-Pyx-MkuMQ_FkkhcDVuNj_ZDsYEdSVocG_IIFCVH5rl85NPCtzn91ovbFBAFQji9javJi9i3tWL66WP36KIw4Li74LqpMHJ79EXhfrHlPGS2vbZITfwYuX2dgA" alt=""><figcaption><p><em>The wallet is created on-chain and requires gas to be created</em></p></figcaption></figure>

2\. **Import your position:** After creating a DSA, the next step is to migrate your position from the native Aave/Compound to Instadapp. Use the import position feature from ‘DSA Tools’ > ‘Import Positions’.&#x20;

<figure><img src="https://lh3.googleusercontent.com/OlF2prpDgreoMWT-3DJ63NFTNJ76ptcx7XbQjeMoCaTYeH4yNPHka9wY1a-a6fgeJwevGjJnenGF2_uCk4moh2tNX-RTnBJJNp1lwg2oQrOA7dNISr2cON423vNKfwvx00P9jLtaRvzjrHKvrxrMOYLvpe2f5ML_K44-xDyBXTq509bTgdwlnuTn4GuYLQ" alt=""><figcaption><p><strong>Refer to</strong> <a href="https://guides.instadapp.io/managing-assets/managing-assets-on-instadapp/migrating-defi-assets-into-your-dsa"><strong>this guide</strong></a> <strong>for detailed instructions</strong></p></figcaption></figure>

**3. Use the refinancing feature:** Now that your positions are migrated into Instadapp. You can make use of the refinancing feature to migrate from Aave/Compound to Morpho within Instadapp. \
\
On [Instadapp](http://defi.instadapp.io), Go to ‘Utilities’ > ‘Refinance’. Select ‘Aave v2’/’Compound’ in the left panel & ‘Morpho’ in the right panel.&#x20;

Specify the amount to be transferred (Click max to transfer the whole position) & click on ‘Refinance’.&#x20;

{% embed url="<https://youtu.be/Uta8I2lH00s>" %}
Once the transaction completed your posiiton will be refinanced!
{% endembed %}

**4. To migrate the entire position in 1 click:** Use the refinancing strategy from the strategies section on the Aave-v2/Compound page. This strategy will fully refinance your position in full, use the Refinancing tool for partial refinancing.

<figure><img src="/files/0vmWRrLtHK5OwTbKoZ4s" alt=""><figcaption><p>Find the Refinance Strategy in the Strategies tab</p></figcaption></figure>

<figure><img src="/files/5uOyPtiKTcQaPtPXgIo2" alt=""><figcaption><p>Scroll to the bottom and hit migrate to finalize. The position will now be under the Morpho protocol tab!</p></figcaption></figure>

### **Migrate from Aave v2/Compound to Morpho within for existing users**

If you already use Instadapp, & have a position on aave/compound through Instadapp’s UI. There are 2 ways you can potentially transfer your funds:

1. **Refinance entire position:** If you want to migrate your entire position from Compound or Aave to Morpho, you can do this using the refinance strategy in the strategies section.\ <br>

   <figure><img src="https://lh5.googleusercontent.com/nqP7XwEv8lZtKUGaNNhN3fyjxg1oQNJvZ2CKXr7HVswFE2pTL1sYdVxkejqZzanbYbfp6_5RU75Eu0Entz5yAFshiFyD431LIFLfT2IagxKKNdotCcCubJVZpAAjfcqQ3cYW9W0ln2yYgOts9RvLV3JjBwXdVJwKQHKp7fnzvuU0Ne1wT0h5WmZ0ioi7dg" alt=""><figcaption></figcaption></figure>
2. **Migrate custom amounts:** If you are looking to migrate custom values and tokens, you can do so from the [refinancing section](http://defi.instadapp.io/refinance).\
   \
   On [Instadapp](http://defi.instadapp.io), Go to ‘Utilities’ > ‘Refinance’. Select ‘Aave v2’/’Compound’ in the left panel & ‘Morpho’ in the right panel. Specify the amount to be transferred & click on ‘Refinance’.

<figure><img src="https://lh4.googleusercontent.com/QqubTunlO5URu1cqleKll9caSjthgHeT_KvW_QK_4avhZtPVbKABnipeeEzkAx1O1HTg2EjwK9PUIl1YwU5m876SxNyuYojW5V1KqmcuGdzF7WiffjCUZlv41mnxZKGJkwBMu-xS7jmMk3_KOUMF_oGb7-7JXW9f2cGmRYFmLcjdEKXWfdCJnbWJErDAHA" alt=""><figcaption></figcaption></figure>

## **More from Instadapp**

**Protection Automation:** You can set up protection automation to protect your positions from liquidating due to market volatility.&#x20;

{% content-ref url="/pages/AeBTyVBAidSAJUcWry5j" %}
[Protection Automation](/features/protection-automation)
{% endcontent-ref %}

**Authority:** The DSA Authority feature lets you set multiple owners for a DSA, so that multiple addresses can manage one DSA Account:

{% content-ref url="/pages/cYcVCtqRBWtcXOKBsf0o" %}
[Authority](/managing-assets/authority)
{% endcontent-ref %}

**Crosschain Transfers:** Need to *hop* to another blockchain? You can withdraw assets from your DSA to another blockchain powered by HOP protocol:

{% content-ref url="/pages/PoMnAwJbFSg7HzXRSzUQ" %}
[Cross Chain Bridge](/features/cross-chain-bridge)
{% endcontent-ref %}


# Migrate iTokens to AAVE DSA

Learn how to migrate your iTokens to AAVE

{% hint style="info" %}
This method is exclusively for v1 Lite Vaults. The v2 ETH vault operates on a multi-protocol strategy, making this feature unavailable.
{% endhint %}

You can use the following guide to breakdown your iTokens into their component parts of stETH collateral and ETH debt making them a standard AAVE position you can manage on Instadapp.

This guide will show you how to breakdown you iTokens and a little bit on unwinding on the Instadapp DApp if its your first time.

### Preview of Actions:

* Create a DSA account on Mainnet
* Deposit iTokens to DSA
* Execute Import Script

### Visual Preview:

<figure><img src="/files/GjOIpDOYWkq3Dt3e3Z1b" alt=""><figcaption></figcaption></figure>

## Create a DeFi Smart Account

{% hint style="info" %}
If you already have a Mainnet Ethereum DeFi Smart Account you can skip this step.
{% endhint %}

The import script will migrate the iTokens as its AAVE position to the DeFi Smart Account. If you have never used standard Instadapp you can get started here: <https://defi.instadapp.io/>

The first time you reach Instadapp you will be asked to create an account.&#x20;

![](/files/x41W7KnbPfoBITA1qO2Y)

*The wallet is created on-chain and requires gas to be created.*

## Deposit iTokens to your DeFi Smart Account

You can now deposit your tokenized deposit from Instadapp Lite as iTokens into your DeFi Smart Account.

![](/files/qZcYksbiTevKZaE4VoE0)

Once the deposit is confirmed you can find the iToken balance in the right side panel

![After the transaction is confirmed you will find the iToken balance](/files/1BQKRChqnRpfPKNkPca7)

## Migrate the iTokens to your DSA

You can use the following spell (script) to migrate your iTokens and move your portion to your AAVE DSA. This will migrate the iTokens as their underlying stETH collateral and ETH debt. *This migration utilizes a flashloan and will be charged our standard flashloan fee of 5 bps*

#### Migrate iTokens as AAVE position to DSA&#x20;

{% embed url="<https://play.instadapp.io/Lt6TR2dQlJIcr7Ed02F1V>" %}
If you have an error using this script you may need to use the one below
{% endembed %}

#### Migrate iTokens as AAVE position to DSA (higher flashloan capacity)

{% embed url="<https://play.instadapp.io/3bHm60EMKz9KEiBnEtTz9>" %}

![If you have multiple DSAs make sure you select the correct account](/files/mpN0bPpOtRcPyY6eQnFd)

Once this transaction confirms you will find the iTokens as a position on AAVE in your DeFi Smart Account. Now you can return to the DeFi: <https://defi.instadapp.io/>

![Refresh the webpage if you had the Instadapp interface open](/files/OpIDBs1Ca4jUuwhbjo9O)

## Managing your AAVE Position

Now you have a standard AAVE position on Mainnet. Most users would like to add collateral or unwind a part of the position. Here a quick step by step for users who never used Instadapp before.

{% hint style="info" %}
We recommend using the Simulation Mode to test changes to your account before finalizing anything on chain. Simply click Simulation mode on the left side panel.
{% endhint %}

### Depositing to your DSA to deposit to AAVE

When using a DSA you first deposit assets to your DSA then to the protocol. If you would like to add collateral to AAVE you first need to deposit it into the DSA.

![Find the Deposit button on the right side panel; this will show your wallets assets for deposit.](/files/pUHZ3DY559DT6AxR5CWo)

In the AAVE protocol page, find Supply to add collateral to the AAVE position.

![Now the position is standard, you can add any kind of collateral](/files/UEdVqLnemNOi9jmSOt5Z)

### Utilizing the SAVE strategy to deleverage

You can use the **SAVE** strategy to deleverage the position. *Remember if stETH is underpriced in ETH then you would be selling it at a loss.*

Once your in the AAVE protocol page; on the right side panel you can find Strategies; in Strategies select SAVE

![](/files/oxAtO5X0zUmzlz9IAm0Z)

**Here we imported 0.4 iETH into Instadapp as an AAVE position, Let's review the SAVE panel using an example:**

![Here we imported 0.4 iETH which is now in its AAVE position form](/files/WchWHaKm6G48FnQYax5w)

In the example above we want to close the position i.e have no debt. From the top right going down:

* We see the input of **0.9515 stETH** to be used to payback ETH debt.
* In the grey we see an estimate of the ETH received which is **\~0.9025 ETH**
* This is a bit more than the debt owed **0.9015 ETH**; this is because SAVE is a swap strategy and is not exact; so you can overpay a small bit here to make sure you have no remaining debt.&#x20;
* In this example we lose **0.05 ETH** to fully unwind the position using stETH with its current depeg.


# Quick Start Primer

Quickly download the Instadapp basic information and learn how Instadapp works

Let's begin! What is Instadapp? Instadapp is infrastructure for Decentralized Finance. Instadapp is a collection of contracts, services and features that comprise the Instadapp protocol we sometimes refer to as the '**DeFi Smart Layer',** powered by a smart wallet called a **DeFi Smart Account.**

### What is a DeFi Smart Account? <a href="#block-a1b0cc7265e046d1a3475d79a3487692" id="block-a1b0cc7265e046d1a3475d79a3487692"></a>

A DeFi Smart Account is a unique smart contract wallet used to interact with Instadapp. The wallet is non-custodial and owned only by you. The smart wallet is owned by your regular Metamask wallet but has its own address and can store its own assets. Most transactions on Instadapp do not interact with your wallet directly but rather the DeFi Smart Wallet you generate. Want to learn even more about the Defi Smart Account? **See:** [**Dive Deeper: DeFi Smart Accounts**](/dive-deeper/defi-smart-accounts)

### Why do I pay gas to create the account? and does the smart wallet need gas? <a href="#block-4cf6aa615ddd42d290caa8f9ce01e6cf" id="block-4cf6aa615ddd42d290caa8f9ce01e6cf"></a>

When you initiate a DeFi Smart Account (DSA) your wallet directly creates its own DeFi Smart Account. This ensures the wallet is controlled and owned solely by you. When you interact with the DSA you pay gas from your regular Metamask wallet which is the owner of the DSA. Once the initial account creation transaction confirms you will find your account loaded into the interface.

#### Locate your unique DSA Address <a href="#block-15807d39283a4378ad24e2075d28f8cb" id="block-15807d39283a4378ad24e2075d28f8cb"></a>

Your DeFi Smart Account is a smart wallet on Ethereum so it has its own address. You can lookup your account on the blockchain for better view.&#x20;

![](https://codex.instadapp.io/_next/image?url=https%3A%2F%2Fsuper-static-assets.s3.amazonaws.com%2F52f07785-fab3-4b4a-8409-e5be158d058c%2Fimages%2F647e5ecb-6ca0-4e44-bc78-e15ced0f8e9e.gif\&w=3840\&q=80)

When you interact with the integrations on Instadapp these integrations interact with your unique DeFi Smart Account so these interactions do not occur on your Metamask address.

* You may not see your Instadapp accounts on other protocols as they do not load your DeFi Smart Account.
* Your unique DeFi Smart Account has its own addess and is searchable on Etherscan.
* Explorers like [Zapper.fi](http://zapper.fi/) and [Debank.com](http://debank.com/) support Instadapp accounts and will list your DSA assets.

{% hint style="warning" %}
Smart Wallets live only on one chain, if you create a DSA on Mainnet you cannot send assets from polygon into your Mainnet DSA you must first bridge them. **See:** [**Cross Chain Transfer**](/features/cross-chain-bridge)
{% endhint %}

To begin using your Instadapp Account deposit assets into the account using the deposit screen. You can also import your DeFi Positions using the import screen.

*Wait, but where is my wallet balance? First time using a smart wallet? **See:*** [***Not able to see your wallet balance?***](/smart-wallets/defi-smart-account-dsa/not-able-to-see-your-wallet-balance)

![Your brand new DSA will start empty and its time to deposit some funds](https://codex.instadapp.io/_next/image?url=https%3A%2F%2Fsuper-static-assets.s3.amazonaws.com%2F52f07785-fab3-4b4a-8409-e5be158d058c%2Fimages%2Fec542c38-fa07-4e3c-a0f0-dc28c90c6b4e.gif\&w=3840\&q=80)

### Utilizing Protocols with your DeFi Smart Account <a href="#block-bb38be5696f940c6a7e531d443da9db6" id="block-bb38be5696f940c6a7e531d443da9db6"></a>

Remember that Instadapp is its own wallet so any interactions occur within it. If you borrow assets and would like to utilize them with your Metamask wallet you will need to withdraw them out of the DeFi Smart Account.

### Learn quickly by testing the interface using Simulation Mode

{% hint style="info" %}
The Simulation Mode works best with Mainnet and can be activated on a live account, it will fork your wallet into the simulator so you can test using your real balances.
{% endhint %}

#### Using the Simulator try to:

* Swap some ETH for USDC
* Deposit ETH on Compound and Borrow DAI
* Refinance your Compound position to AAVE
* Debt Swap the Now AAVE DAI Debt to USDC
* Payback the Debt
* Keep testing until you feel like a DeFi genius!ca

#### Other things to keep in mind <a href="#block-9bcb01ee925f4bfeaf6454e083e263c3" id="block-9bcb01ee925f4bfeaf6454e083e263c3"></a>

* At the moment there is no way to export debt from positions, so there is no one click export. You may need to withdraw the position manually, this may require unwinding or paying back outstanding debt.
* Your DSA is controlled by the Owner/Authorities so you can add additional wallets you own to access the same account with different addresses. This can be helpful for giving yourself another access point to your account.

### &#x20;<a href="#block-c20799ae786b4dd5997bc88b5a22d9b4" id="block-c20799ae786b4dd5997bc88b5a22d9b4"></a>

## Welcome to the DeFi Smart Layer <a href="#block-33d25ad432da42cf9f3339c56de3a03c" id="block-33d25ad432da42cf9f3339c56de3a03c"></a>

You now have a super powered DeFi native Smart Wallet! You can import a position from another protocol or being by depositing assets. Before starting to use Instadapp you can get a great preview by utilizing the Simulation Mode.

### Do More with your DeFi Smart Account <a href="#block-e541dc7a2a3b4cbd9b2f44e171c759e3" id="block-e541dc7a2a3b4cbd9b2f44e171c759e3"></a>

#### Strategies <a href="#block-f0b1b7b9b1534255ad5b8cd39fcb4972" id="block-f0b1b7b9b1534255ad5b8cd39fcb4972"></a>

Strategies are one click functions which combine multiple operations for a desired effect. Strategies allows users to gain the most value from their assets and brings efficiency to DeFi. The two most popular and most used strategies on Instadapp:

*Levarage: Token A (Collateral) is increased by borrowing against Token B (Debt)*

*Save (or Deleverage): Token A (Collateral) is sold to pay back Token B (Debt)*

#### Refinance

Instadapp offers many ways to refinance or migrate your debts between protocols. You can migrate debt and positions between AAVE, Compound and MakerDAO Vaults.&#x20;

Your DeFi Smart Account is packed with features and functionality to make it your treasured smart wallet and an essential component to your DeFi journey! Here are a few more topics and tutorials to get your started:

{% content-ref url="/pages/ZyBRzuPMS3zNDCw4dMU0" %}
[Managing Assets on Instadapp](/managing-assets/managing-assets-on-instadapp)
{% endcontent-ref %}

{% content-ref url="/pages/cxCx5FuP6HwdK8NKsOyw" %}
[Managing Uniswap on Instadapp](/protocols/uniswap/managing-uniswap-on-instadapp)
{% endcontent-ref %}

{% content-ref url="/pages/Hi9edxoJeqIjBdsbkLkv" %}
[Advanced Withdrawals](/smart-wallets/defi-smart-account-dsa/advanced-withdrawals)
{% endcontent-ref %}

{% content-ref url="/pages/PFy0Svc8HRudR5zVfvOG" %}
[How to add an Authority to your Account](/managing-assets/authority/how-to-add-an-authority-to-your-account)
{% endcontent-ref %}


# Metamask Tx Creation Issues

Many users are reporting issues with Metamask and Polygon. Please see the guide below on how to correct the issue on Metamask.

***

*The error may appear like this:*

![](/files/L2gJqQm548ZYG2W1uq6y)

*Or include other text like this:*

> ⚠️ Internal JSON-RPC error. { "code": -32000, "message": "execution reverted" } Please contact our team on Discord with this reference id: n137-iJOJyknvH5.

{% tabs %}
{% tab title="😫 Whats the issue?" %}
Polygon infrastructure has taken some hits in the past few weeks and this has caused Metamask wallets to incorrectly generate transactions.
{% endtab %}

{% tab title="😃 Whats the solution?" %}
Reset Metamask and correctly send a transaction so the transaction ordering can be fixed
{% endtab %}

{% tab title="🤨 Other workarounds?" %}
Use a different web3 wallet. The issue relates to how Metamask handles RPCs and networks, this is a minor issue but is not present in other wallets.&#x20;

We recommend [Rabby.io](http://Rabby.io) which will handle the multiple networks for you seamlessly and offer you a great multi-chain experience.\
&#x20;<img src="/files/FYvPt4Hmqqlz0uxaCnuy" alt="" data-size="original">\
*<mark style="color:purple;">A better extension wallet for DeFi users</mark>*
{% endtab %}
{% endtabs %}

### 1. Before we start lets check:

* Metamask is updated! We advise using **Brave or Firefox** over Chrome, more users report issues with Chrome
* Make sure you disable other wallets or web3 extensions. If you use Brave check that the wallet setting in the browser is set to `None`
* If you recently upgraded your Ledger, it may have turned off smart contract signing; please make sure **Blind Signing** is `Enabled`
* If you have a polygon transaction that has been pending for more than 2 hours it has been dropped. We’ll fix this in step 2.

### 2. Reset Metamask

In the Metamask settings under **Advanced** you can find `Reset Account` This will clear Metamask of any outdated data\
\ <img src="/files/8qKPuR1KYDCu4QWfb2Vr" alt="" data-size="original">

#### 3. Enable Nonce Transaction Data

In that same Advanced menu find **Customized Transaction Nonce** and toggle it `On`\
\
![](/files/ulypm3tHfOJVIazutLim)

{% hint style="info" %}
**What is the Nonce?** In this case, Nonce most simply represents the ordering of your transactions from your wallet.
{% endhint %}

#### 3. Review Blockchain to find your last used Nonce value

Find the latest transaction that your wallet sent *(not received you will see the nonce of that sender)*

![Click on the Transaction Hash to view the Transaction](/files/CRVgFO5dGfzd2xVfzAkx)

You need to click `Click to see more` to see the section with the Nonce Number

![](/files/NIFVxAuyCRlsknjKxDUf)

Find the Nonce number in bold and make a note of that number. This represents the transaction order number.

![In this wallet the last used Nonce was 992](/files/6eQXDSkQe2kq80A7GDZu)

#### 4. Create a SELF transaction using the proper nonce

Now using Metamask simply send some matic (any amount) from your address to your same address. This time when you go to send the transaction you will see the Transaction Nonce.

The Nonce Number should be +1 higher than your last sent transaction. Compare it to the Nonce number you found in your last transaction, if it is incorrect please change it to the correct number and send the transaction.\
\
![](/files/hCzPrMgh0LHP9Fb2UGLC)

#### 5. Thats it! You should see the SELF transaction on the block explorer

If you did everything correctly you should see the SELF transaction appear on the blockchain. In some cases, if you sent several transactions with errors that were stuck they may confirm now.

![](/files/tMGjSmLn8y0VsAiX8AC2)


# How to hard reset on Metamask

Learn how to refresh and reset the wallet connections

If you have trouble with the interface loading your wallet you can also try a **Hard Reset**

#### 1. Open the Account Tab <a href="#block-cf4f05899f2f4f5ca94c303855dbf7b1" id="block-cf4f05899f2f4f5ca94c303855dbf7b1"></a>

If your account is not logged the `Account` button will show `Create Account`

If you are logged in you will see your account number in this space.

**In some cases you may not be able to open the Tab.** You can append `#account` to any interface URL to open the tab. For example here is a link with Account Tab Open <https://defi.instadapp.io/#account>

![](https://codex.instadapp.io/_next/image?url=https%3A%2F%2Fsuper-static-assets.s3.amazonaws.com%2F52f07785-fab3-4b4a-8409-e5be158d058c%2Fimages%2Fd629d08e-ba93-414d-9186-015d22310192.png\&w=3840\&q=80)

#### 2. Disconnect the Wallet from UI <a href="#block-6230bf2c542a466487bf8e562a9445a0" id="block-6230bf2c542a466487bf8e562a9445a0"></a>

In the bottom right you will find the Disconnect, this will disconnect the account from the UI

![](https://codex.instadapp.io/_next/image?url=https%3A%2F%2Fsuper-static-assets.s3.amazonaws.com%2F52f07785-fab3-4b4a-8409-e5be158d058c%2Fimages%2F810f61b1-291b-4181-9d92-bc602cc90807.png\&w=3840\&q=80)

#### 3. Remove Metamask 'connected accounts' <a href="#block-fdb0e910deaf44638cb5f3154055c3c1" id="block-fdb0e910deaf44638cb5f3154055c3c1"></a>

Metamask also 'connects' wallets to site, sometimes having too many different addresses 'loaded' on Metamask can cause an issue or you are not loading into the correct account. You can disconnect all accounts from the site on Metamask.

![](https://codex.instadapp.io/_next/image?url=https%3A%2F%2Fsuper-static-assets.s3.amazonaws.com%2F52f07785-fab3-4b4a-8409-e5be158d058c%2Fimages%2F99fe9fd0-8c74-447f-a6e7-51dadc49cd33.gif\&w=3840\&q=80)

Next time you connect Metamask will ask you which account you would like to load.

#### Other Known Issues <a href="#block-48c6a386435a477cbde55a5a1a173f1d" id="block-48c6a386435a477cbde55a5a1a173f1d"></a>

* Having multiple wallets on the browser may confuse the interface, please try using a browser with only one wallet enabled. (Such as the Binance Smart Wallet Extension, Dapper Wallet, etc.)
* Metamask has issues with Hardware wallets post EIP-1559, most of these issues are solved by using the latest version. There may still be issues with Trezor. Please see this Guide: [Metamask + Hardware Wallet Issues](https://codex.instadapp.io/learn/metamask-hardware-issues-guide) for more information.
* Sometimes clearing your cache can solve some issues.


# DeFi Smart Accounts

Learn more about Instadapp DeFi Smart Accounts

![](/files/QLLk8iIkujcz01QYvbkp) ![Icons for DeFi Smart Accounts](/files/iKsMsgNPavzZuYjRnVSf) ![](/files/Pb9WYDdxjoDWrPeP0Ko8)

### Overview <a href="#block-5140d26362f04b7e97015065687a570b" id="block-5140d26362f04b7e97015065687a570b"></a>

DeFi Smart Accounts (DSA) are contract accounts developed by [Instadapp](http://instadapp.io/) and **trustlessly owned by the users**. In this guide, we will explain the three key entities in the system: DeFi Smart Accounts, connectors and authentication modules.

### **For Developers:** <a href="#block-effd6b2c2231437ba1bacae563c7b1c9" id="block-effd6b2c2231437ba1bacae563c7b1c9"></a>

* Front end developers, including wallets, can build DeFi and smart wallet capabilities on top of their existing products. As new modules are added to the ecosystem, they can extend their DeFi capabilities and business model without the need for any smart contract or security expertise.
* DeFi developers can create complex cross protocol transactions like Instadapp’s protocol bridge with only web2 code.
* Protocol developers can make their systems accessible all DSA users and devs by collaborating with us to build connectors.

For further context about motivation and likely use cases, read the accompanying [blog post](https://blog.instadapp.io/defi-smart-accounts/).

### **Key Entities** <a href="#block-fd750fbe47304e99b9fac2f3a3a2e83c" id="block-fd750fbe47304e99b9fac2f3a3a2e83c"></a>

There are 3 key entities in DSAs:

1. **Defi Accounts**, which are trustlessly owned by the users. Assets are stored here. DSAs can execute composed transactions across connectors.
2. **Connectors**, which are standardized modules that interact with the various protocols, and make the important actions accessible to smart accounts.
3. **Authentication Modules**, which users can use to set guardians, managers or automation bots to manage their DSA. Permissions can be modular down to connector levels. For example, users can allow the wallet provider to rebalance his assets to minimize interest payment or maximize yields, but nothing else.

Let us review each of these in more detail:

![](https://super-static-assets.s3.amazonaws.com/52f07785-fab3-4b4a-8409-e5be158d058c/images/5aeb92f8-aff2-4a55-9ad9-36be1ede508c.png?w=1500)

## **1. DeFi Smart Accounts** <a href="#block-fabe3dd47ca7462cad5831ad20725004" id="block-fabe3dd47ca7462cad5831ad20725004"></a>

DSAs are created by regular Ethereum accounts (or EOAs). Each Ethereum can create as many DeFi accounts as they want. DeFi accounts are fully trustless, so users can choose to withdraw their assets anytime to the owners.

DeFi accounts can compose and execute any number of actions from connectors in a single web3 transaction. Using only web3 calls, frontend developers will be able to string together the available actions in the connectors to create innovative new transactions.

For example, to build the protocol bridge function, the DSA will string together functions across the compound, maker and liquidity bridge connectors. We call these “spells”, and we will be elaborating on them in more detail.

To get started, the `build` function will be called, after which a DeFi smart account will be created belonging to the EOA. The developer can also help user build custom DSAs with one transaction, for example, create a DSA and deposit assets directly, or provide a 3rd party or bot with permissions to manage the assets for example.

## **2. Connectors** <a href="#block-7fc2eb2941f142a78c513ff49e668879" id="block-7fc2eb2941f142a78c513ff49e668879"></a>

DSAs are powerful because they can easily be extended with connectors. Every new connector that is added is immediately usable by any developer building on top of DSAs. Connectors can either be base connectors to protocols, auth connectors, higher level connectors with more specific use cases like optimized lending, or connectors to native liquidity pools.

Let's review what these are, and then we will give an example of how they can be used to allow developers to build complex cross protocol transactions.

#### **Types Of Connectors** <a href="#block-955e3140bab249b38b50735f3b9222bf" id="block-955e3140bab249b38b50735f3b9222bf"></a>

Different types of connectors provide different set of capabilities towards DSAs. Each connector has a set of functions that can be executed by the DSA owner or managers (depending on authentication settings).

1. Protocol connectors: Access key protocol functions directly.
2. Auth connectors: Update permissions of the smart accounts.
3. Use case specific connectors: Execute higher level use cases that cannot be done or expensive with stringing basic functions.
4. Instapool connectors: Access the native short term liquidity pool for features that require asset porting, or "flash loans" for example, porting debt positions, interest payment minimization or yield maximization.

#### **Casting Spells** <a href="#block-2eb4ca44c0234c57881ac2faf028afeb" id="block-2eb4ca44c0234c57881ac2faf028afeb"></a>

`Spells` denotes a sequence of connector functions that will achieve a given use case. Spells can comprise of any number of functions across any number of connectors.

For example, to build the protocol bridge to migrate debt from Maker To Compound, the DSA will `cast` the following `spell` across the Instapool, Maker and Compound connectors.

1. Instapool: Access liquidity
2. Maker: Payback DAI
3. Maker: Withdraw ETH
4. Compound: deposit ETH
5. Compound: borrow DAI
6. Instapool: Return liquidity

Developers can trigger these spells from web2 code (or just the chrome console). They can also be called by a different account who has the right permissions delegated to them by the main account.

## **3. Authentication Modules** <a href="#block-cfe9166bcc7147edaa3bd81335bfed0d" id="block-cfe9166bcc7147edaa3bd81335bfed0d"></a>

Users will be able to grant permissions to other accounts to serve specific functions on behalf of them. These functions includes, but is not limited to:

* Guardians for account recovery
* Co-owner for shared admin management
* Managers for fund management, e.g. yield optimization
* Bots for automation, e.g. vault saving

Because authentication modules can be granular to the level of connectors, access can be provided at multiple levels:

* For the whole DeFi account
* For specific sets of connectors
* To achieve a very high level of authentication granularity - an developer can create a highly use case specific connector.

It is up to the developer to optimize for the right balance of trustlessness and power, and we believe that users will reward the developers who provide the most amount of value in a safe and secure manner.


# URLs by Network

Each version of Instadapp has a dedicated Homepage. Here are the various L2s and sidechains homepages for each instance of Instadapp

#### Mainnet

<https://defi.instadapp.io>

#### Polygon

<https://polygon.instadapp.io/>

#### Avalanche

<https://avalanche.instadapp.io/>

#### Arbitrum

<https://arbitrum.instadapp.io/>

#### Optimism

<https://optimism.instadapp.io/>

#### Fantom

<https://fantom.instadapp.io/>[<br>](<https://defi.instadapp.io/&#xA;https://polygon.instadapp.io/&#xA;https://arbitrum.instadapp.io/&#xA;https://avalanche.instadapp.io/&#xA;https://fantom.instadapp.io/&#xA;https://optimism.instadapp.io/>)